|
|
|
#1
 09-13-2010, 01:54 PM
|
||||
|
||||
|
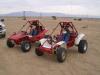
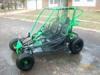
No more rollcage in my line of sight! Does it still look like a Spiderbox?
These short vid's show the new rollcage and drivability http://www.youtube.com/watch?v=97FleRhD38k http://www.youtube.com/watch?v=3igRVE_Vg-g I was also listening for rattles/vibrations on the driver's side new slip-on skin design and since it worked well I'll finish the other side and the hardtop,then strip it all down again for some paint. 
|
|
#2
09-13-2010, 02:31 PM
|
||||
|
||||
|
looking good
__________________
olderthan 2008 tomberline punisher 1500 spring 12g sliders 30mm cv pumper carb uni filter no rev cdi polaris xlt snowmobile shocks for front w/550 magnum springs & blaster fronts on rear and another buggy built working on mods gk-13 white spring 17 gram sliders so far
|
|
#3
09-13-2010, 02:38 PM
|
||||
|
||||
|
looks good!doese it handel better now its stiffer?
__________________
http://www.youtube.com/watch?v=IUgir...ature=g-t=2668 FABRICATION ITS HARDER THAN YOU THINK
|
|
#4
09-13-2010, 04:06 PM
|
|||
|
|||
|
Kinda joyneresque. I like it. Good job man
|
|
#6
09-15-2010, 02:54 AM
|
||||
|
||||
|
Very nice job!
__________________
09 Joyner Sand Viper 250 08 Joyner Sand Viper 250 2009 Joylaris 400 Screamer http://www.youtube.com/watch?v=eeulR4W1_PU
|
|
#7
09-24-2010, 07:12 PM
|
||||
|
||||
|
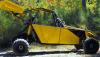
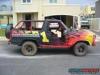
It's going to rain tomorrow and the wife will be racing to the mudholes! Figured I'd better get a pic while it's clean! So here's an update with the Yerfdog mod's and paint while it's still daylight. Still have to put the lights & rear fenders back on.
I mocked up my graphic for "Spiderbox" on the drivers side panel- What do you think? The "Smiley" face was by request from the wife  Seeings it is "HER" toy. Seeings it is "HER" toy.
|
|
#8
09-24-2010, 09:56 PM
|
||||
|
||||
|
it looks good hard to tell its a yerf dog except front on
__________________
olderthan 2008 tomberline punisher 1500 spring 12g sliders 30mm cv pumper carb uni filter no rev cdi polaris xlt snowmobile shocks for front w/550 magnum springs & blaster fronts on rear and another buggy built working on mods gk-13 white spring 17 gram sliders so far
|
|
#9
09-30-2010, 05:24 PM
|
||||
|
||||
|
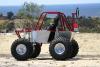
Here's the finished Spiderbox-
|
|
#10
09-30-2010, 05:41 PM
|
||||
|
||||
|
Here's some close-ups of details.New roll cage has handholds.Closed in front clip w/ battery box. HD ball joints still working, heims will come when these wear out or fail. Last pic's show tire clearances.
|
|
#12
09-30-2010, 06:27 PM
|
||||
|
||||
|
Man night and day difference. Nice job!
|
|
#13
09-30-2010, 08:32 PM
|
||||
|
||||
|
great job!what did you make the body panels out of?
__________________
http://www.youtube.com/watch?v=IUgir...ature=g-t=2668 FABRICATION ITS HARDER THAN YOU THINK
|
|
#14
09-30-2010, 11:11 PM
|
||||
|
||||
|
This was end cuts of ABS type plastic. The properties are the same as the seats that come in the Yerfdog. Similar to racers plastic. Since they were the discard end cuts they're irregular and rough.I salvaged two different sizes-2' x 4' x 5/16" & 2' x 5' x 1/8". VERY durable and light. And did I say "FREE"!!!!
|
|
#15
10-02-2010, 08:46 AM
|
||||
|
||||
|
free is the best!!!
__________________
http://www.youtube.com/watch?v=IUgir...ature=g-t=2668 FABRICATION ITS HARDER THAN YOU THINK
|
|
#17
11-08-2010, 03:42 PM
|
||||
|
||||
|
thanx Rarerat- and congrats on the ownership of a PILOT!!!!
|
|
#19
10-03-2011, 07:59 PM
|
||||
|
||||
|
This project continues-Here's a peek at it so far. Pulled the Howhit GY6 150 out and set a Honda TRX200SX in it's place-well kinda! I've fallen in love with this particular engine due to it's 5 speed semi-auto transmission with reverse,chain drive,electric and pull start features. It has a wealth of power (around 15-18 hp),it weighs 81Lbs. only 25 Lbs. more than the GY6,the reliablity and extreme fuel economy. I got to set it much lower in the swingarm so the center of gravity will be greatly improved.It fits so well I could rebuild the motor without removing it from the buggy!!!Hopefully in a few days I'll be testing it out for performance.
|
|
#20
10-06-2011, 09:10 PM
|
||||
|
||||
|
Update- got to work on it again this evening and took it for a quick test drive @ 9pm. I've made a fatal error on this mod!!!!!
 In 1st gear it's as fast as the Howhit engine,I climbed one of our 12' hills with ease.This is my wife's buggy and it's faster than mine In 1st gear it's as fast as the Howhit engine,I climbed one of our 12' hills with ease.This is my wife's buggy and it's faster than mine Tomorrow I'll try and get it out before dark for some video.The pic's show the Honda wiring harness all in place for the engine area,Stick shift with reverse lever- the only wires I have to modify are the ignition switch,on/off,push start button and light switch- I have to make a dash to house the the switches/indicator lights and lengthen them to the steering wheel area. Still have to make a brace for the exhaust pipe too. I robbed the carb off my buggy to see how it would run as the other one that came with it was trashed!! New carb $32.50 with shipping! Tomorrow I'll try and get it out before dark for some video.The pic's show the Honda wiring harness all in place for the engine area,Stick shift with reverse lever- the only wires I have to modify are the ignition switch,on/off,push start button and light switch- I have to make a dash to house the the switches/indicator lights and lengthen them to the steering wheel area. Still have to make a brace for the exhaust pipe too. I robbed the carb off my buggy to see how it would run as the other one that came with it was trashed!! New carb $32.50 with shipping!
Last edited by metalstudman1; 10-13-2011 at 09:20 PM.
|
|
#21
10-07-2011, 06:32 PM
|
||||
|
||||
|
Here's a quick test run-The clanging sounds are the aluminum axle spacers-
http://www.youtube.com/watch?v=-1_ANieey2k The engine runs perfect untill I set in the buggy! Didn't realize this till the test run today and it flooded out, took it back in the shop jacked it up and it's running perfect again. I did a few elevation experiments to find I need a different set of shocks,shock bracket change or I need to raise the front of the engine more (maybe 1/2"-3/4").I mounted the engine level with the swingarm. The float in the carb is plastic and not adjustable. Feels very strong so far!!! I did get 3rd gear once for a second or two!!!! This engine is a great match for this chassis.
|
|
#22
10-08-2011, 03:55 PM
|
||||
|
||||
|
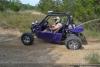
I got the wife's approval after her test drive
 It took almost 2 years of persuasion for her to let me do the transplant because she felt the Howhit GY6 150cc had plenty of power-She's cheeze'n now with the little extra power this engine provides and the needed bottom end torque for climbing our many hills with bigger passengers on-board.Here's her first outing- It took almost 2 years of persuasion for her to let me do the transplant because she felt the Howhit GY6 150cc had plenty of power-She's cheeze'n now with the little extra power this engine provides and the needed bottom end torque for climbing our many hills with bigger passengers on-board.Here's her first outing- http://www.youtube.com/watch?v=tjowgA_D648 http://www.youtube.com/watch?v=Gvfbi-IIGd8 Re-aligned the engines posture in the swingarm and the flooding went away!!!! Still have some fine tuning to do! doesn't want to idle very well (it is a used,stock '86 engine!). I'm going to let her play for few days-then I'll tear it all down and paint everything up pretty!
|
|
#24
10-10-2011, 08:38 PM
|
||||
|
||||
|
Haven't got to run with her yet- Had to order a new axle for mine. I must have done something right because she's not stopped driving it since Saturday!!!!She doesn't know it but I ordered some other gears to slow her down a little!!!!
Last edited by metalstudman1; 10-11-2011 at 10:46 AM.
|
|
#26
10-11-2011, 10:45 AM
|
||||
|
||||
|
No!! It climbs every thing very well the way it is. I need to ensure that I have an advantage on the take off that way she won't have enough trail to catch me

|
|
#27
10-11-2011, 10:20 PM
|
||||
|
||||
|
Ya'll get a laugh from this- My wife says I need to hook up a brake light since she'll be in front all the time now and doesn't want me to rear end her
|
|
#29
10-12-2011, 10:16 PM
|
||||
|
||||

|
|
#30
10-13-2011, 08:54 PM
|
||||
|
||||
|
Got all the wiring done.WHEW
") 14 wires from the rear to the front (3/4" bundle)Brake light,neutral/reverse lights,neutral start switch,keyed ignition,new start button,seperate kill switch,back-up light and new blaster head lights.I also set it up where you can start it in any gear with the pull start just in case something failed in the electric ignition. Rain let up for an hour or so just as I got finished-she couldn't wait to hit the mud!!!! 14 wires from the rear to the front (3/4" bundle)Brake light,neutral/reverse lights,neutral start switch,keyed ignition,new start button,seperate kill switch,back-up light and new blaster head lights.I also set it up where you can start it in any gear with the pull start just in case something failed in the electric ignition. Rain let up for an hour or so just as I got finished-she couldn't wait to hit the mud!!!!http://www.youtube.com/watch?v=RA5K7geYPR4 glad it's raining again so I can pull the axle and silence the axle spacers from clanging around by tapping in some set screws.
|
|
#32
10-15-2011, 08:58 PM
|
||||
|
||||
|
Good luck stugots!!! My axle didn't show up today so I gave the wife's Black Spiderbox a proper shake down "all" afternoon while she was out! (drove it like it was mine!!!!)Can't believe I didn't break anything!!!(of course I'd be fixing it if I did) I did need to tighten the chain after an hour or so, that's all the maintenance it needed.The set screws worked perfectly on the axle spacers-no more clanging!!! It's hard to explain how just 50cc more can translate to the "FUN FACTOR" in this buggy now- night and day difference in the performance from the GY6 and no fear of slipping the belt or backing down hill I couldn't climb. I found a video I shot from a while back of the Yerfdog trying to climb our biggest hill (60'+L x 41' elevation change) and it almost made it!!I'm going to get the wife to video me climbing it with ease tomorrow in 2nd gear for you to have a visual comparison.
|
|
#33
10-16-2011, 10:04 PM
|
||||
|
||||
|
Here's the Howhit GY6 150cc hill climb- http://www.youtube.com/watch?v=PXwyqDgaj6E
Here's the Honda TRX200SX hill climb- http://www.youtube.com/watch?v=qeLiHitTwjw There are several new video's with this engine if you care to view them- here's my channel- http://www.youtube.com/user/metalstudman1?feature=mhee
|
|
#34
10-21-2011, 06:46 PM
|
||||
|
||||
|
Update: Making ones buggy go faster or have more torque will cause something to fail!!!!! My wife finally broke one of the BD balljoints
 So now I can add Heims- I'm gathering/ordering all my parts right now to completely re-do the A-arms with Heims @ both ends (12 Heims). The brass bushings in the bulkhead connection are wearing out again ($5.00 each x 8) and I want that issue to go away. For you to get an idea of this -I'm using the same type of set-up on aftermarket ATV or from the Crossfire/Punisher/Dune 150 A-arms. I'll post pic's & pricing for that modification as soon as the parts get here and I verify that it's going to work!!!! Can't see everything in my head without making it a reality. So now I can add Heims- I'm gathering/ordering all my parts right now to completely re-do the A-arms with Heims @ both ends (12 Heims). The brass bushings in the bulkhead connection are wearing out again ($5.00 each x 8) and I want that issue to go away. For you to get an idea of this -I'm using the same type of set-up on aftermarket ATV or from the Crossfire/Punisher/Dune 150 A-arms. I'll post pic's & pricing for that modification as soon as the parts get here and I verify that it's going to work!!!! Can't see everything in my head without making it a reality.Side note: I did out run her in a drag race (if you want to call it that)!!!  We're even till 3rd gear where I just walk away from the Spiderbox-can't explain that as my gearing is lower than her's. I'll get some video as soon as I get her frontend done. We're even till 3rd gear where I just walk away from the Spiderbox-can't explain that as my gearing is lower than her's. I'll get some video as soon as I get her frontend done.
Last edited by metalstudman1; 10-21-2011 at 06:52 PM.
|
|
#35
10-21-2011, 08:28 PM
|
||||
|
||||
|
are the bushings actually brass, or are they sintered bronze bearings? if you added a bronze sleeve as a liner for the remainder of the center of the tube (basically having the entire length of the thru-bolt supported) I think the issue--if i'm reading your description right --- would go away.
|
|
#36
10-21-2011, 10:20 PM
|
||||
|
||||
|
They probably are bronze- one at each end with a steel sleeve in the middle.I've replaced these 3 times in 3 years, constantly tightening the through bolts to square them against the bushing and the sleeve. Already put a grease zerk in to help them survive longer. There's just too much force against the bushings with our terrain and driving style.A Heim joint won't get egg shaped anywhere near as fast. looks like I can buy a Heim for the same price as a bushing-still debating on 1/2" (space is tight on the bulkhead) or just go with a 3/8" I know will fit.
Last edited by metalstudman1; 10-21-2011 at 10:33 PM.
|
|
#37
10-22-2011, 06:57 AM
|
||||
|
||||
|
I've been staring at as many spiderbox and other dual arm front ends as I can trying to figure out exactly how they configured the A-arm mounts at the "box" end. I've been considering using the bronze bearings in the a-arm tube along with a same size bronze bearing going through the front and rear plates of the box with the excess length trimmed flush to the inside of the plates and a thrust washer between the two. Trying to avoid having the thru bolt ride against the plate metal, which is how it seems to be from the factory. I like your idea though, cut off the end tube (move it outward between the a-arm legs for rigidity), and install lugs and heims in the ends of the tubes and weld in some grade 8 bolts with enough shoulder area for the heims to ride on..
|
|
#38
10-22-2011, 10:34 PM
|
||||
|
||||
|
FYI- I had nylon washer against the bulkhead & the bushing flange. Before I added a second layer of plate at the bolt holes to keep the A-arm from ripping out there was some flexing. Now it's very rigid and the bushing takes all the forward/reverse forces.
You almost got the mod right!!!!My intent @ the bulhead is to add another pair of bolt flanges for the Heims to fit in (just like a shock mount).All thread with a sleeve & jam nuts in between the bolt flanges to keep them squared up all the time, this gives the bulkhead 4 points of force resistance instead of just two.Misalignment bushing don't care if it's a bolt shoulder or threads as it rotates in the Heim.This is all in my head and untested- I know with our driving style it'll fail quickly if it isn't right!!! Also I made the spindles 3" longer back when to add wider tires up front -Now my wife will get her WIDE fronts installed!!! Last edited by metalstudman1; 11-21-2011 at 09:44 PM.
|
|
#39
10-22-2011, 10:58 PM
|
||||
|
||||
|
I can picture what you want to do. my thought on it though, is that you're still possibly ending up with a shaft (the bolt through the mount flanges & heim) that is "loose" and will be transmitting the shock into the openings it passes through. What you've now got me thinking about doing is welding bolts through the bulkhead plates from front to rear so they're fixed and slipping the heim jointed a-arm on from the back and nutting it in place on the welded in bolt. The ID of the tubing I'm using would allow me to install a pretty hefty heim and mounting "stud" and i'd be able to have the heim right up against the bulkhead. drawback is it's one sided support of the connection vs two sided. while we're on this type of subject, having to repeatedly straighten out the flimsy steering rods on mine every time i blip a tree or rock got me to thinking about where to put hardware designed to fail before something like a ripped out a-arm mount or bent spindle occurs. This is something for when i finish the a arm conversion and install a rack & pinion. i was thinking that a drilled out (stacked holes) tie rod stud wouldn't be a bad idea. keep a couple in the buggy taped to a wrench for quick field replacement ....
|
|
#40
10-23-2011, 11:46 AM
|
||||
|
||||
|
I'm thinking about your welded bolt for the Heim scenerio. the problem with steering rods is they are flimsy!!! all of ours have gotten bigger stronger rods- also correcting the alignment/location for the rod is usually needed-with yours the rods are very thin and long due to the center pivot- with the rack improvement the rod get's considerably shorter and the rods are much heftier. We haven't bent a single steering rod since a rack-n-pinion was installed. Having the spindle tab set for Ackerman alignment removes alot of the poor geometry from the factory and allows the wheel to turn smoother through it's path reducing the stress on the steering rods.
|
|
#41
11-08-2011, 10:28 PM
|
||||
|
||||
|
Figured a few of you might like the rubber on the front!!! I have new tires (same size) that I haven't mounted with a better front tread design than the ones on it. It drives really well with them, since my wife can't seem to stay out of the mud we feel these will help her "SPLASH BIGGER" and not rut up the trails (low mud filled spots) so bad!!!
|
|
#43
01-20-2012, 09:10 PM
|
||||
|
||||
|
Welcomed abuse in the yerfdog!!! but from my daughter (7 yrs.old going on 16) "Daughter like mother"!! she ran so many times through the mud she broke one of the rear fenders off from too much mud weighing it down, the second one ain't far off!!! Again I don't ever have the camera with me when the great stuff occurs, but here's what I could get.
http://www.youtube.com/watch?v=tF15sNeE1kk http://www.youtube.com/watch?v=rAHbImzFE5U
|
|
#45
01-21-2012, 09:47 AM
|
||||
|
||||
|
Quote:
Great videos!!
|
|
#46
01-21-2012, 02:17 PM
|
||||
|
||||
|
Thanx guys- this is why I do this as a hobby.
The carwash idea is on my list!!!!!
|
|
#47
01-27-2012, 11:50 PM
|
||||
|
||||
|
Spent all afternoon playing in the dirt/mud. This vid is kinda long but THIS is why I enjoy this sport/hobby. My daughter decided since I just washed the Yerfdog that it needed some character again!!! This vid is a testament to the durability of what we build/modify and the determination of a 7 yr. old doing what she loves.
Didn't realize how white her teeth were! http://www.youtube.com/watch?v=Un4Yj...ature=youtu.be Last edited by metalstudman1; 01-28-2012 at 10:47 AM.
|
|
#52
01-29-2012, 10:54 AM
|
||||
|
||||
|
Great pics and vids ... you should print out the third and 4th one and let her take them to school with her .... she won't have any problems with the boys ... )))) "I'm coming to get you!" ... and "you got a problem with that? Take a look at the last kid who bugged me ...."
|
|
#54
03-12-2012, 10:18 PM
|
||||
|
||||
|
Well after waiting on a fab. shop for over a month (calling nearly daily) to bend my new A-arms tubes- I decided to do it myself!!! I bought a 1" conduit bender and went to work. I made a mock-up one first to make sure I had a means to complete them and they'd work without the "U" bend. As it turns out I got lucky when checking with a recycle/salvage yard for 1" x .065/16 gauge tubing before buying some from a steel supplier. I bought 6pcs. x 24' long for $40.(had some surface rust)
 A single 20' piece from the steel yard was $67. I'm going back to get the balance of what they had since it was soooo cheap. I meant to take pic's through the whole process and got started and forgot. Here's some pic's of the tail end of the fabricating. I still have to weld in the bungs & paint. A single 20' piece from the steel yard was $67. I'm going back to get the balance of what they had since it was soooo cheap. I meant to take pic's through the whole process and got started and forgot. Here's some pic's of the tail end of the fabricating. I still have to weld in the bungs & paint.
|
|
#56
03-13-2012, 06:27 AM
|
||||
|
||||
|
Nice ... I so need a good drill press! Those cuts into the tube ends really chew up the hole saws, don't they!
For steel, i don't know how close it is to you, but there is a NC branch listing. (or maybe was, they're link doesn't seem to work within this site, but the phone numbers are there.) PA Steel is reasonably priced and sells to the public, no matter the quantity. I paid .90 a foot for the 1" .095 wall tubing through its allentown warehouse. http://www.pasteel.com/
|
|
#57
03-14-2012, 04:18 PM
|
||||
|
||||
|
x-bird- thanx for the link. The only time I have an issue with hole saws is when the inner cut piece tries to get out the slot of the saw. I did good!! didn't even loose a tooth in about 30 cuts.
Figured I share some pic's of the balance of the front end re-fab. Pic's show the A-arm tabs and installation of them. To make sure they all ended up being spaced properly I just cut a tube for the center and bolted the whole thing together. I knotched the already beefed up bulkhead and welded in the whole A-arm set-up- worked well and fast!!! made it easy to line the A-arms up. Then I made some shock brackets & done!!!!
|
|
#58
03-14-2012, 04:34 PM
|
||||
|
||||
|
I've been racking my brain trying to figure out why the heims made the steering so hard-After some close inspection watching the steering arms through it's travel- the stock ball joint end on the rack was getting in a bind due to the angle of of the A-arms and my re-location of the rack. Kept ripping the racks dust boots too. After adding 4 more grooves to the rack the dust boots were being stretched too far. So to simplify things all the way around I made a studded clevis to attach to the rack, the ball joint on the rack was 1" long, when removed the boots weren't being stretched too far. Have a bearing going bad in my homemade hubs so I ordered some new hubs from BMI (still waiting on them to get here before welding a new bolt/spindle on).
Somemeore pic's of the steering parts change over and assembly.
|
|
#59
03-14-2012, 07:34 PM
|
||||
|
||||
|
Thanx back at ya! You just solved an issue i discovered last night--bind at the rack end if i go as far down as i'd like. I'm going pretty short on the steering arm, rack is going front steer mounted as close to center between the arms as i can get it. Don't think i'm going to have to notch the rack, i like things razor sharp reactive so to speak. I'm also ditching the single-through tube on both upper and lowers and doing like yours as i can't find 8-inch long 3/4 dia bolts with 6.5-inch smooth shanks. I've been making my own, but i can't get the threads to run square and they're heavy. I'll stick with bronze bushings (unless i can find urethane to fit). Also going to order up some tubular cro-mo race bolts for them if the price is right (racebolts.com). Still waiting on the spindle shafts. they were 1/2 done last weekend and supposed to be wrapped up but .... I've decided no more trade or getting put on the b-list for small jobs.
Here's a little goodie for everyone ... Finally figured out what the nuts i was using as misalignment spacers/nuts on the original 3203 tie-rod ends were. Stared at them for sooo dang long wondering where they came from--- they're stock 3/8 fine thread rocker arm nuts from one of my old engines. they look like a lug nut and are hardened. I had them welded conical side up to the steering arms and also cut one down for the pitman ends. If that's the same dia as the bolts your using through your heims, it's a cheap source of a high quality substitute item. The shaft on my homemade notcher is only 3/8 and is a little sloppy in the 2.5-inch long bushed sleeve. It tends to wander a bit. fine on a full tube, I can land itwher i want it and get a nice 90. the teeth grab hard and lock up or shear off when i break through the wall on an end of the tube cut like you have in the pic. I'm lucky to get a dozen notches per saw. Last edited by x-bird; 03-14-2012 at 07:53 PM.
|
|
#60
03-14-2012, 08:26 PM
|
||||
|
||||
|
I think you're going to find that the stock rack turning radius is less than desirable unless your steering tabs are really close to the spindles pivot point/kingpin-(stock turning radius is 40'+/- or 3-1/4" lock to lock). My tie-rod/heim stand-off's are valve guides that I drilled out to 3/8"-(whew!!) & tapered them @ at the top!!!
|
|
#61
03-14-2012, 10:31 PM
|
||||
|
||||
|
Those A-arms look great man, and the heims turned out pretty good too! I need to get a Floor drill press also, I went through every tooth on my hole saw using a Vise and a drill.
T.J.
__________________
T.J. Yerfdog Spiderbox, Uni Type air filter with 6" intake, 130 jet, Orange no-rev limit cdi, Red coil, iridium plug, 1500rpm clutch springs, 1500rpm contra spring, 13g sliders, 22" rears, 21" fronts, aftermarket reverse installed, and Trailtech Vapor.
|
|
#62
03-14-2012, 10:33 PM
|
||||
|
||||
|
I'm going to be about 1 inch from the fronts of the a arm with the tie rods, about 3 inches from the spindle center. if i have to notch, no biggie. Same mounting point/distance from center as with the pitman steering. probably had about a 25-30 foot radius.
|
|
#63
03-27-2012, 09:33 PM
|
||||
|
||||
|
I've been beating the stuffing out of this buggy to see if there's anything else I need to do to improve it's driveablility.I did a normal inspection after doing some jumps and saw I had broke the interior weld on the spindle bolt. After removing the wheel I snapped it completely loose- thank goodness I had it welded thru the tubing. I decided to just make new spindles all together to change how the tie-rod/steering arms connected too. Tomorrow I'm going to give it another rough run to see how well these work!!!
|
|
#64
03-27-2012, 09:51 PM
|
||||
|
||||
|
By matching the angle of the tie-rod/steering arm tab on the spindle there's NO binding or any need for tall stand-off's. Also realized that with the heim mounted under the tab instead of on top it can't ever come in contact with anything. The stiffer steering with the heims went away by doing these little corrections and now it steers easier than before with ball joints. Also notice I made additional shock mounts for-12",13" & 14" shocks (upper bracket to get a double hole mount too) the SC shocks are getting weaker and weaker every time I take it out so now I can shop for a few different length shocks. I couldn't be happier with the rubber encased sleeved bushings I used at the bulkhead(zero maintenance)- The A-arm actually moves on the rubber and not on the bolts. When I take the shocks off the A-arms stay put and can move thru all it's travel with just the rubber rotating(like having mini shocks) they spring back to where they were tightened down and the sleeve never rotates. I also made multiple holes on the tabs for the steering arms just for a variety of adjustments.
|
|
#65
03-27-2012, 10:02 PM
|
||||
|
||||
|
Nice save! What's the spindle diameter, 5/8ths? Do you have any pictures of you're sleeve/bushing setup? I get what your saying (just like a cars control arms, gotta tighten it on the ground with final load on it or the bushing is locked in the wrong spot and will eventually tear up), just trying to picture it. you "split" the tube into two bolt sections, correct?
|
|
#66
03-27-2012, 10:51 PM
|
||||
|
||||
|
5/8" -post #10 shows the wheel/bolt and pipe sleeve. It was just a bolt in a pipe as a stop sleeve for the hub to hit.The 1st pic of the old/stock spindle is where I cut the grade 8 bolt off after breaking the rest of the sleeve off.
I'll make a short vid of the A-arms without shocks to show how solid this set-up is- and did I say NO maintenance!!!! I can already say that I won't be using a bolt thru a bushing with grease again!!!!
|
|
#69
03-28-2012, 06:30 PM
|
||||
|
||||
|
I currently have the buggy depot spindles installed on my yerf they are ok, built strong, but I want something with some Ackerman. so I might be taking some notes from you guys and build my own, and just use the BDX ones for spares.
__________________
T.J. Yerfdog Spiderbox, Uni Type air filter with 6" intake, 130 jet, Orange no-rev limit cdi, Red coil, iridium plug, 1500rpm clutch springs, 1500rpm contra spring, 13g sliders, 22" rears, 21" fronts, aftermarket reverse installed, and Trailtech Vapor.
|
|
#70
03-28-2012, 11:02 PM
|
||||
|
||||
|
Are the BD spindles like the stock design?
The new A-arms have provided for better stability- outside of the wheels is now 57" vs 50" when stock. The wife was giving the Yerf a beating today and complaining about the power when she decided to prove her point in the yard!!!! http://www.youtube.com/watch?v=T8mHjgkMoBw The SC shocks finally bottomed out really hard in a jump and it snapped a Heim on the tierod/steering arm (I measured the total travel at the spinde to be over 6" to have put the steering arm in a bind) so I going to move the rack to the center to give the steering arms less angle and equal them out. Also these BMI hubs allow for wheel wobble @ max turning radius- something I haven't had an issue with before, so more work and testing. Last edited by metalstudman1; 03-28-2012 at 11:05 PM.
|
|
#71
03-28-2012, 11:34 PM
|
||||
|
||||
|
yep the BD ones are like the stock ones but just stronger... they have no angle or anything.
__________________
T.J. Yerfdog Spiderbox, Uni Type air filter with 6" intake, 130 jet, Orange no-rev limit cdi, Red coil, iridium plug, 1500rpm clutch springs, 1500rpm contra spring, 13g sliders, 22" rears, 21" fronts, aftermarket reverse installed, and Trailtech Vapor.
|
|
#72
03-29-2012, 07:44 AM
|
||||
|
||||
|
Most just don't realise sometimes how much work, trial and error is involved in these projects. The factories have both engineers and computers to boot before even assembly occures. Change one thing and something else changes. Many hours are needed as well as patients. The end results are deffinately worth the patients and labor when all is done. Your doing a great job and thanks for sharing this with us.
|
|
#73
03-29-2012, 12:32 PM
|
||||
|
||||
|
Thanx Tom- I do spend countless hours trying to improve stability and durability with what few skills & equipment I have (hours of labor-infinite!!!!). Hopefully some of these trial & error experiments will stimulate someone else's brain power into a viable solution.
FYI- I did realize that the width of the vertical tube supporting the spindle bolt in stock form is 2" wide and allowed the forces applied to the spindle bolt to be on the surface area only and flexing the weld. I changed to a 1"x 1"x 1/4" vertical tube and now I feel the bolt head is better supported by the sides of the tube,less surface area to flex- of course this is only my thinking-time & beating will tell!! Last edited by metalstudman1; 03-31-2012 at 07:05 PM.
|
|
#74
03-29-2012, 02:26 PM
|
||||
|
||||
|
I'm not by anyway an expert on this, but from what I am seeing this is the way I would do it and why. Provided I understand what you have done correctly, I would run the axle suppotr tube all the way through weldong it both sides of the square tube, this will equalise the load to both sides of that square tube thus eliminating most if any flex to the outside of the tube it is welded to. Does this make any sence or have I got it wrong as to what I am looking at.
TOM
|
|
#75
03-29-2012, 02:43 PM
|
||||
|
||||
|
Given that this is MSM's wife's buggy, i think it'll survive fine-and i'm pretty sure she doesn't baby it either. now for MSM's, own ride, i would think that a 5/8 dia. axle just isn't enough for jumping/rough riding. even with going through both walls and a thinner box tube, sooner or later if it doesn't break it will likely bend upwards. MSM is definitely correct in that the side walls and a 90 degree angle close to the axle/weld of the smaller diameter box tube will help. the larger box size probably did help it flex on the one wall surface contributing to it breaking the weld.
One of the reason's i went with a golf cart hub is the 1 inch axle plus its 1.25-inch attachment diameter. even that is going to get gusseted to the tubes since i can't go through it. Those axles hold up six 8v batteries, up to four riders, the electric motor and transmission--then the modders begin to add lift kits etc. and they still survive (i've been a longtime buggies gone wild member for their stock tech help when i had a fleet of 10 club cars)-- a heck of a lot more weight than these karts.
|
|
#76
03-29-2012, 02:50 PM
|
||||
|
||||
|
Doubling up the thickness on the outside wall thickness of the spindle will also make it stronger. This would not have to be done on the inside since there is much less leverage on that side. Could it be that the heat from the weld on the outside weakened the steel?
|
|
#77
03-29-2012, 03:01 PM
|
||||
|
||||
|
Tom you got it right- the stock spindle did have the bolt thru both surfaces, the pic is where i cut the bolt off after cracking the outer weld.It took 3 years of beating before this occurred. The stock tube is 3/32" where as the tube I used was 1/4" adding a slight more amount of material in a smaller space.The original spindle bolt was 5/8" and I had made a set of hubs with some bearings I had that were 20mm (slightly larger than 3/4")and didn't bent a bolt- I'm cautious of the 5/8" as well, but that's what fits the BMI hubs (not too impressed with them either). I was trying not to use a heavier hub as this adds additional weight in the wrong place!! Like I said- more beating and testing to pursue.
By the way-my wife is every bit as rough on this buggy as me without trying too!!!!
|
|
#78
03-29-2012, 03:28 PM
|
||||
|
||||
|
5/8" grade 8 bolts are pretty strong and should take tons of abuse... a yerf shouldn't bend one and if it does your doing some pretty high jumping. I'd think the welds or something else would break before the axles do.
I have the heavy duty hubs from BMI, they are pretty good, but the bearings that come with them don't last to long... I'm trying to find some better 5/8 ID bearings that would hold up a little longer. I have these installed now so hopefully they will hold up a little longer http://www.*************/item/High-Sp...38-600630-5887
__________________
T.J. Yerfdog Spiderbox, Uni Type air filter with 6" intake, 130 jet, Orange no-rev limit cdi, Red coil, iridium plug, 1500rpm clutch springs, 1500rpm contra spring, 13g sliders, 22" rears, 21" fronts, aftermarket reverse installed, and Trailtech Vapor.
|
|
#79
03-29-2012, 04:46 PM
|
||||
|
||||
|
You can swap out the bearings in the hubs for 3/4" ID if you want stronger spindles, but I do not know if there are any 1" ID bearings that fit it. Check out VXB.com for bearings and Heim joints - The prices seem reasonable.
|
|
#80
03-29-2012, 06:49 PM
|
||||
|
||||
|
Quote:
I looked for a 3/4" bearing that was cheaper than the 20mm ones I had & I bought the hubs with bearings for $8. more than replacing my old bearings!!! GX150- The spindle bolt probably did break due to welding as it always makes the surrounding area hardened/brittle. The fact that they lasted 3 years is pretty good with the abuse it gets. I've been tempted to use some of my ATV hubs with disk brakes but the Spiderbox is so light they don't really need front brakes-(I really like sliding the backend around with just the rear brakes!!!) It's just hard to justify the extra work,brake lines,master cylinder & maintenance.
|
|
#81
03-29-2012, 10:13 PM
|
||||
|
||||
|
these are the bearings that mine came with http://www.*************/item/Wheel-B...ID-300171-5885
Out the box they have more slop then the ones I posted earlier. The problem is when I tighten down the axle bolt onto the hub it kinda squeezes it a little, and that coupled with the abuse from the trails they start to loosen up more. I think if I put a spacer in the center of the hub in between the bearings then tighten it down it would keep the lateral pressure off them making them last a lot longer.
__________________
T.J. Yerfdog Spiderbox, Uni Type air filter with 6" intake, 130 jet, Orange no-rev limit cdi, Red coil, iridium plug, 1500rpm clutch springs, 1500rpm contra spring, 13g sliders, 22" rears, 21" fronts, aftermarket reverse installed, and Trailtech Vapor.
|
|
#82
03-29-2012, 10:13 PM
|
||||
|
||||
|
I spent a lengthy amount of time measuring & measuring &........ to find out that Yerfdog engineers did a pretty descent job getting the stock rack location and spindle tie-rod tabs heights correct for minimal bump-steer and almost dead-on Ackerman triangulation points-- That being said- When you have extended A-arms and elevated suspension!!!!, don't know if that was correct for a stock set-up. I moved the rack back up to the stock location & I mounted my 14"-16" shocks (Carrera Hyper coilover shocks off my "different type of buggy") to see if these will work well since I have several different springs to fine tune them- they also have 7" of travel. I'm picking up another set of 5/8" x 7" grade 8 bolts tomorrow to remake my spindles as it's too much cutting to try and re-use the ones I just made-trial &error!!!By using the clevis type end on the rack, it allows for alot more travel. The only thing Yerfdog could have done better would've been to angle the tie-rod tab the same as the A-arm angle.
FYI- The spacing on the spindle tabs for true Ackerman is 3-3/16" away from the center or ball joint holes, 90 degrees from the spindle bolt. We all know that having the tie-rods/steering arms parallel to the A-arms is key to keeping the tires parallel/vertical when moving thru it's travel when going straight (also minumizes bumpsteer in turns). I'm also going to measure the camber on full turn in relationship to the stock 9 degree angled bulkhead. I feel that it's too much leading angle as in my sprint cars I only used 6 degrees. More boring stuff yet to come.
|
|
#83
03-29-2012, 10:23 PM
|
||||
|
||||
|
Quote:
|
|
#84
03-29-2012, 10:48 PM
|
||||
|
||||
|
Yep, that's what I was thinking, I know trying to find or make a spacer for the center is going to be a pain, but the benefit will be worth it. The next challenge will be keeping it centered so that when you go to slide the spindle axle through the hub it will slide through the spacer too.
I have a couple 1.5" 5/8ID spacers laying around I'm gonna try and make something work out of them if I can.
__________________
T.J. Yerfdog Spiderbox, Uni Type air filter with 6" intake, 130 jet, Orange no-rev limit cdi, Red coil, iridium plug, 1500rpm clutch springs, 1500rpm contra spring, 13g sliders, 22" rears, 21" fronts, aftermarket reverse installed, and Trailtech Vapor.
|
|
#85
03-29-2012, 11:04 PM
|
||||
|
||||
|
I had spacers in my front hubs. I would leave the outside bearing off until the spacer was threaded on the spindle and would tap the outside bearing on to the hub after it was on the spindle (a large deep well socket worked great).
|
|
#86
03-29-2012, 11:07 PM
|
||||
|
||||
|
My thinking as well- that's why I was looking for a bearing stop to tack weld on the inside of the hub. Let me know what you come up with- I'll still be hunting for the right size pipe/tube.
|
|
#87
03-30-2012, 12:54 AM
|
||||
|
||||
|
trying to visualize the issue you guys are having-- i take it the bearing races and the center protrusion are loosening up with the cheap ones? I have a few of those lying around and could never see a reason to use something like that compared to a fully sealed bearing. The upgrad ones -- the snap ring acts as a stop against the hub's outside or inside edge? Is there anyway to remove the snap ring and get them to seat flush with the hub edge then stake them in place? if the fit is good to the inside of the hub, green loctite (for sleeves etc) might also be an option.
|
|
#88
03-30-2012, 01:07 AM
|
||||
|
||||
|
Well, to picture it just picture a 3" tube with nothing in it, the bearings sit on both sides and the only thing stopping them from sliding inward is the snap rings or the lip (depending on the type of bearing). The only thing stopping them from moving out is the spindle bolt, and like MSM said if you tighten that bolt down to much you'll either break the snap ring, or push the inner ring of the bearing out of place creating lots of play.
The spacer on the inside will allow us to tighten the bolt down a lot more and it will put the pressure on the inner rings but they wont move, and now they should last longer. these are the hubs I have and the bearings that came with them in the pic ... http://www.*************/item/Heavy-D...ub-260056-3203 you can see the inner ring how it protrudes, after a bit of riding that inner ring gets very loose, and the spindle bolt gets closer and closer to the bearing until you have to tighten it down and its basically riding and grinding on the outside of the bearing. wall and not the inner ring. Hope that explains it a little.
__________________
T.J. Yerfdog Spiderbox, Uni Type air filter with 6" intake, 130 jet, Orange no-rev limit cdi, Red coil, iridium plug, 1500rpm clutch springs, 1500rpm contra spring, 13g sliders, 22" rears, 21" fronts, aftermarket reverse installed, and Trailtech Vapor. Last edited by T3beatz; 03-30-2012 at 01:17 AM.
|
|
#89
03-30-2012, 06:10 AM
|
||||
|
||||
|
so a sleeve is what you're after for what is basically a floating bearing seatup when you step up to a better bearing. the original is flanged to prevent it from going into the hub more than it should. Sounds like it's a difficult match for 5/8ths and the bearing inner. Basically a reflection of engineering by accountants, plain tubing for a hub with a wheelbarrow bearing vs one with a tube machined slightly oversize to allow the bearing to stay in position and a proper bearing. id get a 5/8ths ID tube with 1/8th wall thickness then find a good sealed bearing to match id, od and the inner race and sleeve OD. of course, by the time you go through all that, it may just be as cost effective to switch to a different hub.
Here's a flanged, non-protruding center bearing with correct od and id for your hubs/axles http://spbusa.thomasnet.com/item/inc...=prod&filter=0 Last edited by x-bird; 03-30-2012 at 06:40 AM.
|
|
#90
03-30-2012, 09:55 AM
|
||||
|
||||
|
If you go up to post #78 you can see the bearings I switched to, they are much much better and have no play out of the box. I have the 5/8ID spacer, just have to measure bearing to bearing and all should be good.
__________________
T.J. Yerfdog Spiderbox, Uni Type air filter with 6" intake, 130 jet, Orange no-rev limit cdi, Red coil, iridium plug, 1500rpm clutch springs, 1500rpm contra spring, 13g sliders, 22" rears, 21" fronts, aftermarket reverse installed, and Trailtech Vapor.
|
|
#91
03-31-2012, 12:00 AM
|
||||
|
||||
|
Here's the newest spindles-
|
|
#92
03-31-2012, 12:32 AM
|
||||
|
||||
|
You work fast MSM... If only I had the tools. I need to unbend one of my spindles, and you have built 4 new ones in the mean time.
__________________
T.J. Yerfdog Spiderbox, Uni Type air filter with 6" intake, 130 jet, Orange no-rev limit cdi, Red coil, iridium plug, 1500rpm clutch springs, 1500rpm contra spring, 13g sliders, 22" rears, 21" fronts, aftermarket reverse installed, and Trailtech Vapor.
|
|
#93
03-31-2012, 08:16 AM
|
||||
|
||||
|
Quote:
The hubs i chose--based on the rims i had --dictated my axle size, resulting in a lot of unsprung weight. the version i'm working on now is a lot lighter than the single arms were with the same basic components. if you watch my vid with the "tec's last ride" you can see the weight of the tire/spindle assembly overpowering the stock shocks. They had no ability to keep the tire on the ground and i was only "puttering" around at about 1/2 speed on that ride. that extra weight out there adds a lot of stress, which i try to account for. But i also know i can slam this thing into things that might prove disastrous for others. Anyway i fully get where msm's thinking is coming from and it is correct for his application. When it comes to suspension, there's always a compromise that has to be made--no 2 ways about it.
|
|
#94
03-31-2012, 06:54 PM
|
||||
|
||||
|
Short vid showing the bushing limits- I set the right side up higher just to show you could actually time the position of the bushings
http://youtu.be/bNub8wU6L7A Here's a short vid of the actual front end travel thru the turning radius http://youtu.be/UatnsvznNJM Here's a short vid of the tire straight on thru travel http://youtu.be/VyHLg1LI9Ac Pic's show my solution for the wheel hub bearings- regular DOM 1" sch.40 is almost a perfect fit, I made the stop bushing (2-1/2") slightly smaller than the snap ring placement so if you want the snap ring to hold the bearing it still can. I simply drilled a couple of holes in the hub and tack welded the hole to hold the bushing in place. It didn't remove the wheel wobble but I feel better about the bearings!!! I weighed the stock spindle = 3lbs-1.8oz My newest spindle weighed in at = 3lbs-11.4oz I also added a 1/4" plate same as the beefed up ones from BD. I welded the bolt on the spindle tube(countersunk hole for the weld) only and welded the 1/4" plate down the sides to avoid un-tempering the grade 8 bolt at the point it would bend. Lastly I'm showing the tire clearance(full turn) with no spindle bushing(still have 1" more to space the wheel out) I end up with a ride height of 13-1/2" with me in it- that's the rearend height as well- Too muddy to beat it up in the trails so it got a shake down in the grass- SWEET results, beautiful turning radius and smooth travel, I'll be leaving the heavier coil-overs on for the time being as they work well. I tried to get a wheel to hang in the air on a steep small hill and couldn't (7" of travel)- that's awesome!!!
|
|
#95
03-31-2012, 08:15 PM
|
||||
|
||||
|
Okay this is to correct a unintentional false statement - unloaded wheel travel is 11-1/2"
 I could still push down an 1" on the elevated wheel. I could still push down an 1" on the elevated wheel.
|
|
#96
03-31-2012, 08:17 PM
|
||||
|
||||
|
that looks awsome! don't you wish the back wheels could do that too?? lol I don't want to get you started! or maybe I do...
  I'm gonna see what I can get out of mine tonight, probably like 7-8"
__________________
T.J. Yerfdog Spiderbox, Uni Type air filter with 6" intake, 130 jet, Orange no-rev limit cdi, Red coil, iridium plug, 1500rpm clutch springs, 1500rpm contra spring, 13g sliders, 22" rears, 21" fronts, aftermarket reverse installed, and Trailtech Vapor.
|
|
#98
03-31-2012, 08:22 PM
|
||||
|
||||
|
That would be IRS suspension and without tons of HP you can't sling the rear around like you can a solid axle
NO FUN!!!!
|
|
#99
03-31-2012, 08:27 PM
|
||||
|
||||
|
Yeah, I know I wouldn't mess around with it either, seems like a pain in the but to set up. Nice job man, looks like I need longer shocks! lol
__________________
T.J. Yerfdog Spiderbox, Uni Type air filter with 6" intake, 130 jet, Orange no-rev limit cdi, Red coil, iridium plug, 1500rpm clutch springs, 1500rpm contra spring, 13g sliders, 22" rears, 21" fronts, aftermarket reverse installed, and Trailtech Vapor.
|
|
#100
03-31-2012, 08:58 PM
|
||||
|
||||
|
Thanx again Tom- flattery WILL get you everywhere!!!!
Just for informations sake- these gas shocks are a little cheaper (about $200. each with all the harware & spring) than Fox or Works!! don't know yet if they'll be as gentle on the equipment yet.
|
 |
|
|