|
|
|
|||||||
| Mini Buggy General Discussion General Discussion forum for Mini Buggies. (American Sportworks, HammerHead, Carter, etc) |

 |
|
|
Thread Tools |
|
#1
 12-21-2011, 11:38 AM
|
||||
|
||||
|
And so it begins ... stripped it down this morning. Rust is worse than i had thought. The main frame tube going around the floorpan will be coming out and getting replaced. Too many pinholes in it. Thankfully the pan is stitch welded with some pretty wide gaps so not a lot of grinding. I'm going to add 6 inches to its length while i'm at it. This is going to be tricky, gotta work on it then hide it for the next month or so ... little one is always nosing around in the garage ....
Last edited by x-bird; 12-21-2011 at 11:40 AM. 
|
|
#2
12-21-2011, 01:27 PM
|
||||
|
||||
|
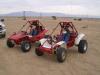
here's the coffee grinder.
 Guy said he had it running a few years back. Came off a reel mower, most likely a JD the paint is original. My Jacobsen reel mowers used Briggs engines painted orange-red. I'm thinking it's mid 70s to mid 80s, it does have a breather valve and supply back to the funky sliding choke carb, pretty simple. Cleaned the tank and carb out and put it back together already. It's giving me fits, it wants to run, good compression and fuel supply, no sparky. Shocked me good last night when cranking. the spark plug lead off the coil had a piece of copper wire soldered to it then just wrapped around the coil terminal. I soldered that in place but am wondering if the plug wire is damaged internally. getting voltage readings from 1-2 volts to 11.6 when pulling the starter. going to test it at the terminal next and if it's good there, try a section of plug wire from some of my truck leftovers. and of course the pawl mech on the pull start doesn't engage all the time. Guy said he had it running a few years back. Came off a reel mower, most likely a JD the paint is original. My Jacobsen reel mowers used Briggs engines painted orange-red. I'm thinking it's mid 70s to mid 80s, it does have a breather valve and supply back to the funky sliding choke carb, pretty simple. Cleaned the tank and carb out and put it back together already. It's giving me fits, it wants to run, good compression and fuel supply, no sparky. Shocked me good last night when cranking. the spark plug lead off the coil had a piece of copper wire soldered to it then just wrapped around the coil terminal. I soldered that in place but am wondering if the plug wire is damaged internally. getting voltage readings from 1-2 volts to 11.6 when pulling the starter. going to test it at the terminal next and if it's good there, try a section of plug wire from some of my truck leftovers. and of course the pawl mech on the pull start doesn't engage all the time. 
|
|
#3
12-22-2011, 06:30 AM
|
||||
|
||||
|
chop chop ....
got a few of the tubing connections cut before my reciprocating saw decided to completely melt its battery  and the last new cutting wheel on my grinder snagged 3/4 of the way through a tube and disintegrated. Hoping to get some tubing find a local plumber to make the front bends, otherwise i'll just cut and weld it to fit. and the last new cutting wheel on my grinder snagged 3/4 of the way through a tube and disintegrated. Hoping to get some tubing find a local plumber to make the front bends, otherwise i'll just cut and weld it to fit.going to pull the flywheel on the engine this morning to check the points. no spark at all out of it and of course my multimeter crapped out on me, audible continuity tester and ohmmeter portion doesn't work the magneto is obsolete, found 2 places with a replacement, over $60 before shipping! for that price, i may find something turnkey and sell this one for parts.
|
|
#4
12-22-2011, 09:27 PM
|
||||
|
||||
|
yep, the briggs is done .. for now. needs clutch, mag and gasket, about 65 shipped total. getting a 5.5 tec off my brother that needs a bowl gasket for 35. be nice if it has a charging coil. i may throw the money at the briggs over time then sit on it for a few years.
Last edited by x-bird; 12-22-2011 at 09:32 PM.
|
|
#5
12-27-2011, 04:59 PM
|
|||
|
|||
|
that's a nifty little thang; you gonna get daddy of the year
|
|
#6
12-28-2011, 06:57 AM
|
||||
|
||||
|
They built the frame identical to the full size hammerhead--basically a 1/2 or 2/3rds scale version of it. Wife took the lil one to a friend's for a bit yesterday so the angle grinder came out for some fun. got the base tube out in bits and pieces. A retired modified racer up my way bent me up some tubing on christmas eve, glad i took the whole frame up to him to measure from. Had to tweak one bend in tighter, ran out of oxygen after just getting enough heat in it to make the bend. Found two more tubes with too much pitting in them for my liking, but i have some extra tubing to replace them. To lengthen the frame, I only need to cut one tube on each side. Also picked up the $50 quad front and rear end, looks like it was from an E-ton youth atv, parts and tires are match one of the quads my brother has. The front suspension has yerf shocks on it

|
|
#7
12-29-2011, 10:51 AM
|
||||
|
||||
|
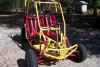
I have officially done the unthinkable ... i expect black helicopters and white vans around my house at any moment ... I used my yerf's old spindle bolts as slugs for the tubing extensions last night
 the hammerhead yerfdog mini shark has been brought into the world BTW, the youth atv parts are from a Baja 90. if anyone has one of these kicking around for parts, i need a right-side front brake/hub backing plate. It's not essential, but it would let me add front drum brakes along with the rear axle disc brake. One side of the cable bung on the one i have is broken off. This little thing has better features than my yerf! the hammerhead yerfdog mini shark has been brought into the world BTW, the youth atv parts are from a Baja 90. if anyone has one of these kicking around for parts, i need a right-side front brake/hub backing plate. It's not essential, but it would let me add front drum brakes along with the rear axle disc brake. One side of the cable bung on the one i have is broken off. This little thing has better features than my yerf!
Last edited by x-bird; 12-29-2011 at 10:53 AM.
|
|
#8
01-08-2012, 08:06 AM
|
||||
|
||||
|
A little update, i'm actually much further along than these pics. Just haven't had a chance to shoot it. Made the "chop," bottom frame is in, and the upper tube with extension is connected. I also had to cut out the uprights at the rear along with the top cross tube. Again, too much pitting. The replacement tubing is already in and i have to cut out and either extend or replace the side tubes. In addition to the lengthening, I also raised the top rear of the frame to get more headroom. The atv swing arm is going to work well. reversed the axle/sprocket to the correct side last night, cleaned and painted the main tube and primed the swingarm. That piece still needs the holes enlarged as it will have a 3/4 mount bolt using my old yerf rear mounts. The yerf's engine plate will get cut and welded to it, then i have to come up with shock mounts for the old yerf shocks. Once the rear is done, then i can work on grafting the atv swing arms to the front and adding the shock mounts. I'm going to have to extend the tie rods on the steering rack.
|
|
#9
01-10-2012, 06:02 PM
|
||||
|
||||
|
I think it has a new name coming ... The Dog Shark ... The evil wizard cross-bred more Yerf and Hammerhead genetic material today
 .... Hey mike, got a tape measure? Forgot to get my front roll hoop dimensions before i chopped it up! .... Hey mike, got a tape measure? Forgot to get my front roll hoop dimensions before i chopped it up!  Now I just have to weld the rear tube to the frame, finish a couple frame side tubes, add some mounting tabs for the front suspension, move the front roll cage posts then i can install the shock mounts--I aligned the side rails just inside the main frame's uprights. i'll put a gusset plate in the frame corner and install the shock mounts on that. I tried using the upright tubes, but the tires still hit the subframe siderails with the shocks located there--had to narrow it another inch inboard. The atv disc brake is going to stay, need to get a yerf master, line and caliper. Am also probably going to add a couple side supports to the swingarm. Wish i had a way to drop another bearing hanger down to the axle at the frame sides, but it's tapered. Made sure that the swingarm's chain tensioner setup still works, think i'm gonna need it with that little sprocket. Last edited by x-bird; 01-10-2012 at 06:06 PM.
|
|
#10
01-10-2012, 07:52 PM
|
|||
|
|||
|
sure do, happy to check whatever you like.
it's looking good. maybe box in the atv swingarm w/ some 1/8"? Last edited by speedshopmike; 01-10-2012 at 07:55 PM.
|
|
#11
01-10-2012, 09:33 PM
|
||||
|
||||
|
"maybe box in the atv swingarm w/ some 1/8"? "
Are you kidding?!!! that's a HEALTHY STRUCTURE already without being welded to the engine plate!!! It's turning out very nice.
|
|
#12
01-10-2012, 10:42 PM
|
||||
|
||||
|
Boxing both the tabs at the mounts and the main sides from the top of the axle tube pivot to the bottom are on the list. I also want to put a diagonal down from the side tube to brace wherever the shock mount ends up at.
|
|
#13
01-10-2012, 10:49 PM
|
|||
|
|||
|
i figured you were already ahead of me there, jimbo
|
|
#14
01-10-2012, 10:57 PM
|
||||
|
||||
|
Lost my last post twice looking at my pictures
") Meant to add that the filler for the main plates is the 5-6 inch piece of jackshaft plate i cut off the other night. just have to trim about 3/4 off the end of it. otherwise fits perfect. Funny how the ol yerf parts fit this thing like a glove. My last a-arm is going to get halved for new main frame side braces. the originals are too short. Meant to add that the filler for the main plates is the 5-6 inch piece of jackshaft plate i cut off the other night. just have to trim about 3/4 off the end of it. otherwise fits perfect. Funny how the ol yerf parts fit this thing like a glove. My last a-arm is going to get halved for new main frame side braces. the originals are too short.
|
|
#15
01-10-2012, 11:51 PM
|
|||
|
|||
|
when looking at your pics i thought the exact same thing.
hannibal smith said it best about a plan coming together. you're gonna get hugged to death when you hand over the keys; it's been nice knowin ya, dude.
|
|
#16
01-13-2012, 02:49 PM
|
||||
|
||||
|
Little one was back in school today--first day since monday, so i finally got a chance to make some progress.
More Yerf hybridization! Adios control arm.  Looks like the atv front suspension will work pretty well. going to chop the lowers a-arms and make them the same length as the front. spindles are setup with the axle at 90 and the mounts are even. It'll require a new rack location, but it all looks like it will fit.
|
|
#17
01-13-2012, 03:30 PM
|
|||
|
|||
|
your inbox is full, jim; my nikon reply bounced
|
|
#18
01-16-2012, 11:30 AM
|
||||
|
||||
|
Got the a-arms resized and did more mock-up work last night. Going to use angle iron attached to the outside of the front tubing with 1/4-in. mount tabs welded to it to mount the arms. Got the ride height pretty well dialed in, it will still be front-steer. Overall front width (outside of tires) will be around 46-50 inches. It's going to be several inches higher, so i figure it'll provide a lot of anti-roll over stability. Pretty much mimicking what i did with the yerf.
Who's a china ATV "guru"? I am absolutely stumped by the rear caliper setup. The suspension/swingarm parts are off a Baja Motorsports 90cc atv. I have the parts manual for it and it does not show any bracket or mount setup whatsoever. The caliper is designed to be mounted with the bolts and mounting plate going in from the pad/disc side. The only logical way to do this is to use countersunk heads (no big deal) and 1/4-in plates. I need new pads, my concern is that there isn't room for the pads and bracket. The brake disc has no retainer on the axle. Nothing threaded, snap ringed, cotter pinned etc. looks like it's made to free float. Surfing the internet i found a source of china axle tubes for a variety of atvs. all of them have a pair of arms welded on them for the calipers except for the one i have. This axle tube has nothing on it to bolt a mount to and the caliper really needs to mount to the tube because of the chain tensioner adjustment. If anyone has pics of the rear of one of these or knows how this thing should be installed, i'd love to see it. I've got about 10 hours into just trying to figure it out.
|
|
#19
01-16-2012, 11:40 AM
|
||||
|
||||
|
can you post pics of the caliper?
|
|
#20
01-16-2012, 12:50 PM
|
|||
|
|||
|
jim, chinese brakes don't need to be bolted to anything.
everything floats!  you're welcome. seriously, if you cant figure it out send me a pm and i'll give you the phone number of a friend's bike shop who should know.
|
|
#21
01-16-2012, 02:03 PM
|
||||
|
||||
|
It's a pretty common caliper, came off one of my brother's parts atv's, maybe a badger. what i'm concerned with is whether or not the disc will rub on the mounting bracket. I figure it needs a "U" bracket, countersunk holes at the ends of the arms. Rather than going to the axle tube, which will be a pita because i'll have to put at least 2 offset bends in the bracket then brace it up, I may drop the bracket off the side of the engine mounting plate with a pair of slotted holes to allow for any changes made by adjusting the axle tube for chain tension. That might give me a straight plate bracket that should be strong enough. the last pic is with the pads in, but the outerone is completely worn down and the inner is 2/3rds gone. The floating portion is completely compressed into the piston, giving about 5/8ths gap from the floater to the remains of the old outer pad. The "U" bracket won't interfere with the pads, again it's just whether or not there's room with the disc.
Last edited by x-bird; 01-16-2012 at 02:06 PM.
|
|
#22
01-18-2012, 06:18 AM
|
||||
|
||||
|
Got the a-arms done ... today will be shock mounts front and rear and the steering rack. Then the list is down to floorpan cleanup, cage extension, gas & brake pedals and seating. (have a pair of honda cvcc sliders coming) I'm running out of blue!

|
|
#23
01-18-2012, 03:43 PM
|
|||
|
|||
|
thumbs up, jd
|
|
#24
01-18-2012, 04:00 PM
|
||||
|
||||
|
Came oh-so-close to having it on the ground with the front wheels installed and steering completed ....but the bus pulled up with one steering arm mount to go, so i have to wait until tonight to wrap the front and give it my bounce test
Daddy wants to test drive the little bugger!  It wouldn't be an x-bird project if it didn't have some golf ball picker in it ... (round tube for the shock mounts) ... And more old yerf ... tie rods (homemade from 3/8 rod stock) and yerf wheel-side rod ends to extend the ones on it. Dropped the rack forward and down a bit with a quick chop and some tubing. The ball joints it came with were pretty crusty and loose so they're off in the parts bin. had to extend the rods about 6 inches each side and lengthen the steering arms about an inch and a half (clearance issue with the upper a-arm bolt head.) Got them in line and parallel with the upper arm. The new yerf 3206 rack for mine fit in there perfectly--but daddy's got to have something for his .... Last edited by x-bird; 01-18-2012 at 04:02 PM.
|
|
#25
01-20-2012, 02:08 PM
|
||||
|
||||
|
Shark?? more like a land crab with that front end of mine
first pic is with the "lower" shock/suspension setting.front and rear suspension and steering are complete, frame just about completely stripped of paint ... did a re-do on the rack/steering arm connection location to provide a bit more turning radius. Chopped the upper a-arm to push it more in line with the lower and cut down on the camber a bit. I made the arms equal length, but my mounting location offset them a bit more than i liked. Still have to monkey up a rear caliper mounting bracket and gas/brake pedal setup. after that it's just a matter of stripping and installing the sheetmetal, painting it up and making a seat frame to work with the honda cvcc slider set. Also going to sneak a couple body measurements off the little one and put a headrest in with padded side extensions to keep her neck from taking too much abuse. Got her a helmet--without those i know she'd be hurting after the first couple rides. Last edited by x-bird; 01-20-2012 at 02:15 PM.
|
|
#26
01-20-2012, 04:02 PM
|
|||
|
|||
|
muy bueno, si!
add a lateral brace 'tween the upper shock mounts so daddy doesn't tweak one "testing"? what rack is that?
|
|
#27
01-20-2012, 06:07 PM
|
||||
|
||||
|
That's the stock rack, for a jr buggy, these things have some pretty nice features. Was at tractor supply today looking at an ASW 150 they had sitting outside--same basic frame and strut design as this thing had. As far as the shock mounts go, they're welded to hardened 1/4 plate (was a security lockbar off a coke machine) and the vertical tube is thicker than 1/8th wall, probably stronger than the cross bar mount i put on my yerf. this thing is a little tank. ))
|
|
#28
01-20-2012, 08:16 PM
|
||||
|
||||
|
That's looking like a BAD-A** machine- the kid is gonna love it, Nice job so far.
|
|
#29
01-24-2012, 02:47 PM
|
||||
|
||||
|
Been working on the adjustable seating. Got lucky and managed to save the adjustable brake and gas pedal setup. Between the two she should have no issue with getting comfy.
Honda CVCC meets Ping golf club racks. If the back looks tall, it is because it's going to get a bolt-in headrest bar. Time is getting short, so I decided to get the frame in paint. Yellow base for now, to be followed by silver, another light coat of yellow and some fog/spatter of red, orange and pink--this will hopefully save my mga from suffering the same fate colorwise). I was going to assemble and test drive then tear down and paint, but that'd be an entire day gone that I don't have. I also would have done some cosmetic touch up on a few of the tubes that have cut marks and rust pits on them, but they shouldn't be noticeable. Coated the garage in blue dust cleaning up the main floorpan, left the base tube bare so i can weld that and the seat rails in without buggering things up too badly.
|
|
#31
01-24-2012, 06:45 PM
|
||||
|
||||
|
Thanks alot man ! My son just saw your update and now wants his done green !
Good kid maybe i,ll teach him how to paint ! My dad had me sand more then i like to remember when i was his age, teach him alittle about how much work goes into his fun! Looks great !
|
|
#32
01-24-2012, 08:45 PM
|
||||
|
||||
 sorry! Lol ... If the frame and floor are decent (not rusty) you can get away with scuffing the gloss of and hitting it with the rattle cans. Stripping this much little tubing is sorry! Lol ... If the frame and floor are decent (not rusty) you can get away with scuffing the gloss of and hitting it with the rattle cans. Stripping this much little tubing is  I mostly used the 3m rust stripping wheels until i got to the cage the other afternoon. Pulled out my old DA with some 40 grit and it ripped through it really fast. I've got a 60 gal. oilless compressor that's really loud and annoying, so i only break out the air tools as a last resort. one of these days i'd like to put a new head on the tank so i can use it without giving the entire house a vibra massage. I mostly used the 3m rust stripping wheels until i got to the cage the other afternoon. Pulled out my old DA with some 40 grit and it ripped through it really fast. I've got a 60 gal. oilless compressor that's really loud and annoying, so i only break out the air tools as a last resort. one of these days i'd like to put a new head on the tank so i can use it without giving the entire house a vibra massage.My night is shot, been trying to figure out a way to run the brakes, i've got a yerf master with a way too short hose and limited room at the pedals. Think i'm going to mount the master at the rear and use my yerf's brake rod. Just gotta come up with a long U-bracket to go around both sides of the master and get hooked to the pushrod. pretty much a variation of what's on it, just reversed. got to make sure that it pulls the pushrod straight into the cylinder and doesn't just pull it on an angle that doesn't do anything but bend the pushrod. maybe i should just find a cable activated caliper --just not sure if there are any of the larger size ones out there...
|
|
#33
01-24-2012, 08:53 PM
|
||||
|
||||
|
What type of Yerf master do you have? How long is the hose?
|
|
#34
01-24-2012, 09:46 PM
|
||||
|
||||
|
I got the yerf master in the same deal as the gy6. its from bmi, came with the mounting plate/lever. the hose is 40 inches. Problem with the mounting plate is that I can get it in front of the pedal only if i move the pedals back--and it's still tight even then. I'm not sure of her fit in the cart and would hate to "lock" the sizing in place based on setting up the brakes. I think i can rig up a shortened version of the original yerf brake rod to actuate the lever (may need some more holes drilled in the plate for it to work) and have the master sit on the side just ahead of the seat. Located there, the hose still won't reach. While i didn't find any cable operated ones that i'm comfortable with buying (i have the dinky little one, it won't work on the bigger disc i have) i did find 68 inch hoses.
|
|
#35
01-25-2012, 10:30 AM
|
||||
|
||||
|
This unit is designed to fit at the rear of the cockpit just in front of the swingarm(right behind the seat), using a rod from the pedal to acuate it. The brake line is plenty long if mounted where it was intended. Is this not possible?
|
|
#36
01-25-2012, 12:22 PM
|
||||
|
||||
|
I think that's the way i'm going to set it up. I've haven't found a good detail picture of a spiderbox back end to see how they were installed. The 3203's rod should be able to reach it, if not, i can get some rod stock and make one. Got the brake pads in the mail, with those i can finally get around to figuring out a caliper mount.
|
|
#37
01-25-2012, 05:11 PM
|
||||
|
||||
|
It's too dark for me to get pic's of mine- I'll post them tomorrow, mine isn't stock but it will show you one way to configure it.
|
|
#40
01-28-2012, 02:04 PM
|
||||
|
||||
|
got the master mount, seat mounting tubes and floorpan welded in yesterday "buh-bye" nice yellow paint! and made the mounts for the caliper on the axle tube. Turns out a pair of 1/4 in steel straight arms is all it needed. Have to install rear floorpan today (little one just left for a bowling b-day party), finish the seat back and strip and paint the parts and she'll be done! Floors are in And I just finished using up a 10 pound spool of wire in 2 months!!!! Thankfully i change the spools before they totally run out and was able to finish using one of my old ones. I've never used up this much wire in such a short time.
Last edited by x-bird; 01-28-2012 at 06:04 PM.
|
|
#45
01-31-2012, 11:17 AM
|
|||
|
|||
|
lookin good, jim!
has anyone else not been getting "reply to thread notices" and/or having trouble with the site rendering properly? it's getting pretty irritating.
|
|
#46
01-31-2012, 01:52 PM
|
||||
|
||||
|
Quote:
 Think 7-y.o. girl Camo. Trying to make sure it doesn't end up looking like ronald mcdonald's ride. Just packed it away til tonight. Still have to strip and paint 1 side of the front suspension, finish the seatback, strip and paint the rims. Cage, pedals /brakes and steering rack are installed. mike You may want to check your e-mail notification settings in your profile. I turned mine off because my e-mail was getting flooded. Last edited by x-bird; 01-31-2012 at 01:55 PM.
|
|
#47
01-31-2012, 03:29 PM
|
|||
|
|||
|
jim, you gotta have the wife secretly video her when you present the yerfhammershark.
that kid's head is gonna explode and you could make big money on youtube!
|
|
#48
01-31-2012, 03:30 PM
|
|||
|
|||
|
hahaha, i just caught the green for go and red for stop on the pedals....nice!
to respond to your earlier question about adequate ventilation: it means "just enough air to stay conscious while enjoying the buzz" Last edited by speedshopmike; 01-31-2012 at 03:31 PM. Reason: to be a smartass
|
|
#49
01-31-2012, 04:55 PM
|
||||
|
||||
|
I got her a helmet, that's going to be the "forgotten 'til last" present then send her outside to see what it's for. The day i let her drive the yerf she asked me to get her one that she could run by herself. I cant wait to be done with this so i can get the garage back in order, it's been a minefield to work in.
|
|
#50
02-01-2012, 07:21 AM
|
||||
|
||||
|
Can i just send you all my parts and have you make me the same thing , front end of this thing is driving me nuts getting it streight , maybe im just to picky but the shock tower,s i have re mounted like 3 times now. you must post vedio when its done !
|
|
#51
02-01-2012, 08:37 AM
|
||||
|
||||
|
Biggest issue i found when trying to set it all up (esp. with a new bottom frame tube) was what to use to square the frame, as the front corners are rounded and the old suspension mounts were long gone. I'd use end of the rear tubes and one of the suspension mount tabs up front to measure diagonally to find the attaching point for the lower arm. You may want to set the bare frame on cardboard, draw your "box" of the frame and set the lower front arm parallel to the box. I also made sure to incorporate a bit of caster angle. Then tack the lower mounts, assemble the front suspension and use machinist squares and straight edges to get the upper position. Are you using just the arms or are you using parts of the atv frame?
|
|
#52
02-03-2012, 12:21 PM
|
||||
|
||||
|
Soooo close! Little one had a half day. I still have to finish up the seat and bolt the rear fenders on. Was trying to fire it up for a test run and ran out of time. Silly me forgot to hook up the ground wire on the kill switch and was pulling like a madman. Lucky for me i made that mistake ... hid it back in the garage only to discover i hooked the gov spring to the wrong spot and had it tensioned tight to WOT.
|
|
#53
02-04-2012, 03:26 PM
|
||||
|
||||
|
First official test run was a success! the old tec gave me some starting fits. The fuel line off the HH tank is pretty tiny and for now just plugged into the Tec's fuel line. Same OD as the ID of the tec line just to show how much of a difference. Took a lot of priming to get fuel into the bowl. The HH tank is really nice, very clean inside, i'm going to have to find a petcock with a bigger pipe ID that will thread into it as the Tec wants more gas than the little 47 cc weedwacker engine. I'd say with the gearing it has, it goes about 20-25 mph, gonna let her have all of it. Turns really nice, little effort and a nice tight radius. Stays real flat and stable, i ran circles as tight as i could full throttle and not a hint of roll-over. I need to air up the tires a bit, spray a little more paint on the seat frame and wipe my footprints off it and she's done. Funnily enough, the yerf shocks seem to have found a "home" that suits them. This is much smoother riding than the yerf, very little of the pogo stick style bounce. Yeah, i know, where's the vid ... pics ... i'm such a kart tease
|
|
#54
02-06-2012, 08:40 PM
|
|||
|
|||
|
saw the pic on FB; looks fantastic!
that thing came oem w/ a 4x cc 2-smoke?
|
|
#55
02-06-2012, 10:37 PM
|
||||
|
||||
|
Last edited by x-bird; 02-06-2012 at 10:39 PM.
|
|
#56
02-07-2012, 12:07 AM
|
|||
|
|||
|
hysterical - that seems to be same 43cc i've got in my minichop....and it, being kind, is NOT fast...
|
|
#57
02-07-2012, 05:42 AM
|
||||
|
||||
|
Made a short vid, found out that both my CD and dvd drives are DOA, so no added soundtrack ...
Still have to fix the floppy fenders .... (round tube bolted to flat plate = broken bolts) ... http://youtu.be/GjRwEpvioHc Last edited by x-bird; 02-07-2012 at 05:46 AM.
|
|
#59
02-07-2012, 12:50 PM
|
|||
|
|||
|
aunt laurie seems to be enjoying herself....i like the way her helmet's sticking outta the cage, lol.
it sure is odd lookin' with the wide front track but i like it. ps: added soundtracks on youtube always suck! it looks really good, jim, nice job, you should be proud
|
|
#60
02-07-2012, 01:59 PM
|
||||
|
||||
|
A kid's dream!!! Perfectly colorful and has a good wheelbase for stability- NICE JOB
|
|
#61
02-07-2012, 02:50 PM
|
||||
|
||||
|
Thanks, she's getting her routine ... home, homework, buggy --seems to like going roundy roundy to the left. "No honey, I will not put you into a jr nascar program--only F1 will do-- or pro rally!" lol ....
proportionally, it's very similar to what i did with the yerf front-to-rear-track. It's nice being able to lay into it and have no worries about flipping. Probably would roll a tire off the rim first. She spooked herself the first day ---got slid over a bit on the seat and was using her right foot to try and push herself back = full throttle + full left turn and did a double donut right at all of us and made her mom take a dive out of the way. Had to talk her back onto the proverbial horse ... Floppy fenders are fixed as is the drippy needle jet (teflon tape). Now I can get back to work on the yerf! BTW--took it through my woods loop --it needed a few bottom out scratches --and promptly slammed the back of my head on the roll bar ...
|
|
#62
02-07-2012, 03:01 PM
|
|||
|
|||
|
<amusing line about no further brain damage being possible inserted here>
|
|
#65
07-23-2014, 05:54 PM
|
||||
|
||||
|
Wow, it's been awhile on this one. Little ones grow so fast! This spring I had to move and raise the steering, move the pedals and swap the bench seat for a single seat made out of a booster car seat.
She did the old man proud, scored a 3rd place out of 6 in the kid's race this past weekend. Double eliminator, she beat a 12 year old running a yerf on alcohol, nearly had 2nd from a 14 year old with another yerf on alky (with datalogger etc no less) until she pegged and took out a barrel. No way to touch the 14 year old boy with an alky animal on a modded manco kart frame. her's was the only 1 with rear suspension . the others were running 50 to 60 tooth + rear sprockets vs hers in the upper 30s, it actually gets up to scary speed pretty fast, enough to run the others down on the straights .... Killer fun to watch. course was an oval with tight 180s, barrels for chicanes down the straights and 2 riders starting at the same time on opposite sides.
|
|
|
|