|
|
|
#1
 06-07-2011, 01:16 AM
|
|||
|
|||
|
About a month ago I received the daily Harbor Freight email and they had 6.5 HP motors for $70. I bought two. One for a walk behind brush hog and another for a kart project. The original plan was to build a buggy from the ground up.
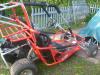
So I've been lurking around for a couple weeks trying to figure out what I wanted to build and how I wanted to build it. During my daily peruse through Craig's List looking for parts I stumbled across this YD 3206. The current owner took it in trade for a parts truck and never did anything with it. The prior owner to him (Evel Knievel) attempted to jump a terrace and snapped the front steering/suspension assembly off the frame. From that day it just sat waiting to be fixed. So the plan is to; 1) Reattach the front assembly. This will include adding some additional bracing. 2) Clean and Tune the motor. Fresh Spark Plug, fluids, high flow intake, carb adjustments and possibly new exhaust. Plan to get the motor running good in the stock configuration before I do to many adjustments. 3) Add some lighting. It originally came with lights but currently just has the wiring. 4) Tires. Currently missing 1 front. Considering replacing the rears with a slightly bigger and more aggressive tread. I'm also planning on going to a front hub and moving to a larger front tire. Stock tire sizes are 20x10-8 for the rear and 15x6-6 for the front. Thinking about going to 22X11-8 in the rear and still undecided for the front. BMI looks like they have some good deals going on. Let me know what you think. Also looking for any additional recommended websites for all things kart related. If you happened to have one of these and have a list of must do upgrades let me hear them. Now time for the pics. Day 1 just unloaded it... 
|
|
#2
06-07-2011, 07:02 AM
|
||||
|
||||
|
Well at least you have the good spindles!!! Is it the bulk head that's bent? Did you get the support plate for the bulkhead that was tore off the lower frame tubing?There are lots of upgrades and advice here for you.It appears that you have a 2005 unit.I know you said you were going thru the engine- What do you want to tackle next? What type of shop equipment do you have and your skill level?
|
|
#3
06-07-2011, 08:23 AM
|
|||
|
|||
|
"Well at least you have the good spindles!!!"
That is good to hear. "Is it the bulk head that's bent? Did you get the support plate for the bulkhead that was tore off the lower frame tubing?" The bottom plate is not really bent except for a corner where it meets up with the tubing. It appears the force of the impact just ripped it off. "There are lots of upgrades and advice here for you.It appears that you have a 2005 unit.I know you said you were going thru the engine- What do you want to tackle next?" I read through quite a few threads last night. You're not kidding about tons of info. Looks like there's a good group of individuals on here. I'm first just going to put the front end back on and try to get it running stock and see what needs immediate attention. The ball joints look pretty rough so I'm sure that will need to be handled sooner than later. "What type of shop equipment do you have and your skill level?" I have some of the basics. Bench grinder, drill press, hole saws, tap/die set, chop saw, band saw and Hobart Mig Welder. I would rate my skill level as a Novice/Hacker but willing to try anything. I have accesss to a Tig unit with an accomplished welder usually attached to it.
|
|
#4
06-07-2011, 05:14 PM
|
||||
|
||||
|
You have as many tools as me! So you can do ANYTHING
 As far as the bukhead base piece the re-enforcement was inevitable (cracked welds anyway) I took a piece of bigger tubing ,sliced a 1/4 section out of the length and laid it over the original frame as re-enforcement. Find the threads about using 1/2" heims for ball joints and that task will be out of the way before the others fail and cause injury to the occupants or the buggy. Find some grade 8 bolts the same size diameter (I believe 3/4") as the spindles only 3" longer. Cut the original ones off. Now drill thru the square tube on the spindle and set the new bolts (2 points of weld now and longer to get the wheels away from the frame alittle more for better turning radius.I relocated the rack-n-pinion to get a better travel on the steering arms and filed 2 more grooves to each side of the rack unit for a really good turning radius(down side to this is it will roll over easier with the stock axle width). There that should take you a few hours!!!!!!
|
|
#6
06-13-2011, 12:20 PM
|
||||
|
||||
|
Buggy Depot now has front hubs with brakes for the Yerf. If you plan on adding additional braking later, this is a better deal. Also the BD hubs are 4/110mm so the bolt pattern will match the rear instead of the 4/100mm (4x4") of the other hubs.
|
|
#7
06-13-2011, 06:12 PM
|
||||
|
||||
|
Hi Soap nice to meet you I had a similar experience LMAO that will be a god lookin spiderbox when ye get er dun!!!! Mike
|
|
#8
06-13-2011, 06:14 PM
|
||||
|
||||
|
look at it this way , the way it is ya got plenty of front end ground clearance

|
|
#9
06-13-2011, 06:17 PM
|
||||
|
||||
|
hey gx do those front hubs for the atv's fit a 3206 also?
|
|
#12
06-30-2011, 12:53 PM
|
|||
|
|||
|
I mounted the front swing arm box for a testing fitting and tried out some old motorcycle shocks I had laying around for a replacement to the stock front shocks and came up with a couple questions.
1) The motorcycle shocks I have are 14" which are 4" over the stock shocks. To help account for the difference I am considering flipping the bottom swing arm. The mounting brackets for the ball joint isn't a concern as I'm planning to replace with a heim joint. Is the bracket mount exposure on the bottom much to be concerned with? Just curious what your thoughts are with doing this based on your experiences. Mount on top ( Too much angle?) Mount on bottom (looks more appropriate) 2) I noticed I have pushed the bottom of the swing arm box forward when I reattached the mounting bracket. I didn't cut enough off to account for the larger tube. How much should I be concerned with this? Is this going to cause me enough issues that I should cut it off and shorten it? Once again, just looking to get feedback based on your past experiences. 3) I'm using this thread as a project log. Should this be located somewhere else on the forum? Thank you...
|
|
#13
06-30-2011, 08:15 PM
|
||||
|
||||
|
For a second look at your frontend alternative-
http://www.buggymasters.com/forum/showthread.php?t=1159 I don't think the angle on the bulkhead will cause any issues. We should have given you a heads-up on the bulkhead, I had to double up the thickness on the A-arm bolt hole supports- These tear out pretty easy with aggressive driving. I use 12" shocks and it performs great, turning the A-arm upside down looks like it might work.I haven't done the Heim set-up yet as the HD ball joints from BD are still going strong, but when you do the bungs for the Heim your shock bracket may interfere. Definitely drill the grease zerk in the A-arms so you can lube them without removal. Also adding gussets at the top of the frame where the bulhead bolts up keeps the welds from failing over time from constant beating. This probably should be moved to 150 tech. What would you like the title to say and I'll move it. Last edited by metalstudman1; 06-30-2011 at 08:27 PM.
|
|
#14
07-01-2011, 12:52 AM
|
|||
|
|||
|
I have some 2" 1/8 inch thick flat I was planning to use to beef up the a-arm bolt holes. How thick of material do you use? The grease zerks are definitely on the to-do list.
What do you mean by gussets at the top of the frame? You lost me there. I was planning on welding a tube between the top and bottom rails on both sides of the bulkhead to help strengthen the frontend. Any reason why I wouldn't want to do that? I've been reviewing ckau's post regarding the heim install. Once I get the bulkhead attached this is my next project I think I'm going to try and tackle. If you could move it and label it "Iowa rebuild of 3206/spiderbox" or something similar that would be great. Thanks for the info...
|
|
#15
07-01-2011, 02:10 PM
|
||||
|
||||
|
Your material for the A-arm support holes sounds right,verify the bolts are long enough when you're done. Also locate your grease zerks with it assembled to make sure you can get your grease gun on them- I moved mine just off center.
I'd have to remove body panels to show you the gussets on my wife's but Kliff's post shows them: http://www.buggymasters.com/forum/showthread.php?t=968 He welded a solid plate on the top where I just welded gussets on the sides and left the center open- I didn't do the lower portion since I sleeved it like you did.-by the way nice job on that. That same sleeve provided the additional support needed for the rack relocation. The span between the top and bottom rails I don't believe needs additional support, the bulkhead does a good job- haven't seen or read about this area failing. Last edited by metalstudman1; 07-01-2011 at 06:28 PM.
|
|
#16
07-05-2011, 11:48 AM
|
|||
|
|||
|
So I'm looking to get the parts ordered for the engine work (filter/exhaust/jets). I've been searching the forum for recommendations for aftermark exhaust setup and haven't found any post with specific model/part numbers on the slip-ons. So here are my questions.
1) What brands & model are you using? (The more specific the better) 2) Where did you order it? 3) Did you run a modified exhaust prior to the slip-on and what differences did you notice(good/bad)? Basically, was it worth the money spent? 4) I found ckau's post regarding his recommended header construction (Stock for 8" size up to 1" for 10" and finally 1.5" for total of 28" overall length. Anyone else have any theories on this. I would just like to entertain all concepts when I go into building mine. This will be my first attempt at constructing an exhaust so any and all pointers are appreciated no matter how basic or obvious they may be. Thanks...
|
|
#17
07-05-2011, 12:39 PM
|
||||
|
||||
|
FYI-The exhaust I put on my wife's Spiderbox was out of need- not performance. The original one literally feel apart, the flange is all I used. I found after modifying multiple pipes that cutting the flange off close enough that I could weld up new pipe and use my die-grinder to clean up the inside of the pipe was critical for proper flow.Since I'm more into function vs. appearance I manage to find tubing sizes to sleeve them with.The most important factor with our exhaust I made was that it stay together regardless the beating and my wanted relocation to the other side of engine to be able access the CVT un-obstructed- I welded a 1/2" steel rod the entire length of the pipe on the bottom to ensure durabilty.Ckau and Rich1 (along with others) have WAY more experience in this area as far as performance and testing- Haven't got a clue if our's runs any better than the stock pipe!
Last edited by metalstudman1; 07-05-2011 at 03:44 PM.
|
|
#18
08-11-2011, 12:21 PM
|
|||
|
|||
|
Found a little time to work on this project over the last couple weeks. Just thought I would post an update.
1) bulkhead reinforced 2) Heim Joints Installed 3) Grease Zerks added 3) Additional plate welded onto end of swing arms for reinforcement 4) Carb cleaned and re-installed 5) Air Filter Installed To-Do ------- 1) Purchase Front Hubs/Rims/Tires 2) Clean/Gut Exhaust 3) Install new fuel lines 4) Attempt to Start 5) Install Driver Seat 6) Install Lights 6) Multiple little task I'm sure I'm not thinking of.
|
|
#19
08-17-2011, 12:26 PM
|
|||
|
|||
|
New tread just showed up. I went with 20x7-8 up front and 22x10-8 in the back. Now it's time to patiently wait for the new hubs and rims for the front end. I'm hoping to having it rolling on all fours by the end of the weekend.
|
|
#20
08-20-2011, 07:42 AM
|
|||
|
|||
|
I got the rear tires replaced last night. It's going to be Monday before the hubs and front rims show up so I moved focus to the engine last night. I changed the fluids, installed a new spark plug, hooked up all the hoses, attached the battery and dumped in some gas. To my surprise she fired right up. I was figuring I was going to have to battle with it for a little bit but I didn't. That's a pretty big relief.
So now I need to wire the lights, install the seat, relocate the battery and wait for the brown truck to arrive. We may be driving this thing come Monday night.
|
|
#21
08-29-2011, 12:22 PM
|
|||
|
|||
|
Monday was a little ambitous. After getting everything mounted I found out I need to do some additional work on the front end. The front wheel width was adjusted enough I needed to gain some additional adjustment with the Rack & Pinion. I also noticed the larger front wheels didn't leave much/enough room between the knuckle & rim.
So I ordered some heim joints to replace the stock ball joint on the steering and notched the knuckle so I could bend the steering mounting arm inward to create some additional gap between the knuckle and rim/tire. I had most of the adjustments made and ready for the new heim joints that showed up Saturday morning and I was able to get the cart rolling for a full day of riding on Sunday. I did not take the time for the additional notch in the rack & pinion but will be taking it back off shortly and performing that upgrade. I've already almost rolled it twice trying to slide the rear around to get turned around without going through the ditch. You guys weren't kidding about the turning radius. Regarding performance, with the current setup my max speed was around 30mph pushing as hard as it would go. The GPS on the cell phone claimed 29 and my neighbor riding beside me on his ATV claimed 31. About 27 on the GPS it didn't feel like I was working the motor to hard. Let me know how that sounds compared to what you guys are seeing. It was able to climb the hills/ditches around here without any problem so I won't be changing anything initially. I can see where some motor work may be in the future to see how much more we can get out of it. It just leaves you with a feeling of wanting a bit more. I also need to remind myself this was purchased for the kid. Not that I need another hobby but I can see where this is going to get addicting. Thanks MetalStudMan1 for all the insight.
|
|
#22
08-29-2011, 01:54 PM
|
||||
|
||||
|
Mine was geared down with a 39t axle sprocket and I was running a torque cam - It would hit about 30 mph and not much more. I had much more bottom end which allowed me to stop mid-hill with two people and go again as long as I could keep traction. These were my engine modifications:
6" intake plenum with 1.5" 2-stage UNI and Outerwears prefilter 3/8" fuel lines w/stock idle and 140 main jets A12 torque cam 1" header w/ drilled Hammerhead sectional muffler Red CDI, orange coil and NGK Iridium spark plug 12g slider weights in 115mm variator w/ red torque spring in clutch pulley 39t axle w/ stock 13t engine sprockets 22" tires on all four corners
|
|
#23
08-29-2011, 02:07 PM
|
||||
|
||||
|
Depending on how big you are will have a difference on the top speed!!!!We're fairly light weights (150lbs) 35mph is usually a good topend for a stock Howhit without a gearing change-We got a confirmed 40mph on gps with just an engine sprocket change. I hear you when you say "It just leaves you with a feeling of wanting a bit more".Great job so far on all your upgrades! The notching of the steering arms should've gave you a little better steering radius.I take it you didn't add a longer spindle axle bolt for the additional tire clearance? The extended spindle axle bolt also adds to the stability as it does for wider tires.It's just never ending the small mod's and the final effect it makes!!!!Have the kids got to drive it yet?!!!!!
|
|
#24
08-29-2011, 09:59 PM
|
|||
|
|||
|
Nope, I haven't done the spindle upgrade yet. That's another one on the to-do list. Definitely going to move up to the 3/4" bolt. I've been testing out the front suspension pretty good. So far I'm pleased with the old bike shocks. You know we have to make sure it's safe for the kids. That's what I'm telling the wife as I blaze through the pasture and down to the creek. I have freed it up from testing long enough to let the kids drive it though. My niece & nephew have been enjoying it also.
|
|
#25
08-29-2011, 10:14 PM
|
||||
|
||||
|
Glad to hear you're enjoying-I mean "testing" the fruits of your labor!!!!!!
|
|
#26
09-03-2011, 07:00 AM
|
|||
|
|||
|
It looks like I will be replacing the spindle sooner than later. Snapped the front right off Thursday night. Luckily it was a non-event and broke as I was just starting to pull away from the garage. Picked up the parts Friday and will be rebuilding both today.
|
|
#27
09-03-2011, 10:09 PM
|
||||
|
||||
|
Don't you hate those unplanned opportunities!!!
|
|
#28
09-05-2011, 10:01 PM
|
|||
|
|||
|
It was a fun weekend of ride and fix. Fixed the spindles Saturday and rode a little bit without problems. Sunday the extended family was over so we put it through some more stress tests and broke one of the inserts I added to the steering for the new heim joints. It was due to a poor weld I knew needed some help so it wasn't a big deal to fix this morning. Took it out in the afternoon and ended up down in the creek ripping through the sand bars and water. That was quite a bit of fun but when it was time to climb the bank and get out the tension adjustment bracket decided to break causing the engine to drop. It didn't look to be made of the strongest material. There was a little collateral damage to the chain cover plate and exhaust but nothing major. So we spent the evening bending and drilling a new bracket and straightening the chain cover plate. It's ready for another run to the creek. I have a feeling this may be routine for a little while. Good Times!!!
|
|
#29
09-06-2011, 11:30 AM
|
||||
|
||||
|
Nice!!! This is the part of owning a buggy/kart that most people don't realize occurs-Thanks for stating the reality and importance of routine maintenance and constant inspection of every little change to keep up with the "Mayhem" we put these toys through. Good luck and it sounds like you & your family are enjoying your hard work.
|
|
#30
09-07-2011, 11:51 PM
|
|||
|
|||
|
I'm officially hooked. Decided if there was any chance for my boy to keep his buggy I better get my own so I picked up another spider box tonight. This one is a little better off to start with (the front end is still attached). The motor still has some potential gremlins to work out but we'll see after we get it all cleaned up. Now time to replay the last few weeks on this one.
|
|
#32
09-30-2011, 09:15 PM
|
||||
|
||||
|
Nice collection!!!!!
|
|
#33
09-30-2011, 10:00 PM
|
|||
|
|||
|
Very nice collection indeed!!!
I'm thinking about getting a second Yerf for the wife (unless I get a rolling chasis and slap a 200 or 250 4-stroke in it  ). We'll see. ). We'll see.What exactly is the benefit of the Heim joints over the ball joints?  I'm going to be replacing my ball joints next. I have the BDX Heavy Duty ball joints in my shopping cart on BD, but if the Heims are better (and for a budget builder/new mod-er like me who knows), I'll gladly do that. I'm going to be replacing my ball joints next. I have the BDX Heavy Duty ball joints in my shopping cart on BD, but if the Heims are better (and for a budget builder/new mod-er like me who knows), I'll gladly do that.Suggestions anyone? 
Last edited by the_law_man01; 09-30-2011 at 10:03 PM. Reason: spell check
|
|
#34
10-01-2011, 10:39 AM
|
||||
|
||||
|
I went with heim joints replacing the tierods on my Joyner only because this is what I could find after breaking a tierod at the bash this past June. I don't see the heims lasting any longer then the tierod except when I sheared the stud the tie rod was toast but with the heim I can replace the bolt securing it. The yerf had bad ball joints to begin with for our type of ridding. A heavy duty ball joint is available for the yerf and if replaced you would probably never need another. The balljoints would be more but to convert to heims would require some fab work.
TOM
|
|
#35
11-21-2011, 05:17 PM
|
|||
|
|||
|
Here's a pic of the blue machine with it's front end beefed up. Moved the stock rear tires to the front and applied some 22x11-10 to the back. It's still having some engine issues so it looks like I will have some garage time this winter getting it sorted out. It's a traveling misquitos repellent. Who needs Off? This will be the first time I've broken an engine down and attempted to build it back up past the carb so it will be an experience and looking forward to it.
|
|
#37
11-21-2011, 06:11 PM
|
||||
|
||||
|
My wife broke one of the HD ball joints!!! it only took 3 years.If you're not insanely abusive the HD ball joints will last.The advantage a Heim has over the HD ball joints is the Heim doesn't get loose as fast. My wife decided to put the narrower tires back on the front as it handles better in the trails, on flat surfaces it is more stable but out in the bush they grab the ruts,roots and rocks alot more making steering more of an effort. Also wide fronts are no doubt harder on the ball joints and A-arm bushings.
|
|
#38
11-23-2011, 01:06 PM
|
||||
|
||||
|
Quick question for you guys, soapkart and GX150, what wheel hubs are you all using for your fronts? I've been searching all over the place and can't find any.
I've found some front ATV hubs on Ebay, but it sucks because none of them have the bolt pattern listed! I'm looking for some with a 4x108mm or 4x110, with the 5/8" bearing, I'm sure if the bearing is not right I can change it out. I'm looking to spend around $70-$80 bucks.
|
|
#39
11-23-2011, 01:29 PM
|
||||
|
||||
|
I used the 4x4" (4/100mm) hubs with 5/8" bearings available at Buggy Depot, BMI or American Power Sports. Polaris rear rims or many trailer rims fit this pattern, but you will not find another ATV that uses 4/100 fronts. If you have the longer/stronger spindles from BD, the 10x8 3+5 rear Polaris rims will fit and you can run 22x8-10 or 23x8-10 front tires. If you go with 8" rims, you will be limited to a maximum size of 20x7-8 tires.
|
|
#40
11-23-2011, 04:48 PM
|
||||
|
||||
|
Quote:
If I can find some cheap 8" rims with a 4x100 or 4x4" bolt pattern I'll buy them, but they have to be able to hold 19x7x8 tires. Also I was gonna buy a couple of these... for spares are to put on another kart http://www.*************.com/item.as...catname=wheels
|
|
#42
11-23-2011, 06:04 PM
|
||||
|
||||
|
cool thanks! I'll look around for some 8" trailer rims. I know BMI has the hubs for like 20 bucks each. (sucks because I just placed an order with them yesterday, should have waited and could have saved on shipping).
Think these will work with the 19x7x8 tires?? http://www.*************/item/8-Rim-260080-760 Last edited by T3beatz; 11-23-2011 at 06:06 PM.
|
|
#43
11-23-2011, 08:08 PM
|
||||
|
||||
|
The offset is 3.5+3.5 - If you do not have the longer BD spindles, the offset will be an issue clearing your spindles. As long as the rim is not wider than your tire, you will be fine. Those 8x7 rims will work on the front with the 19x7-8 tires, 4x4" hubs and BD spindles.
Disregard BMI's comment about them fitting the rear of the Spiderbox or CUV - You need 4/110mm on the rear.
|
|
#44
11-23-2011, 08:20 PM
|
||||
|
||||
|
Cool thanks, I have the BD spindles on the front so I guess I should be good there (don't know what offset is??, I'm kinda a newb if you haven't noticed! lol) I think I just figured it out, it says the rim is centered so you just divided the 7" by 2, simple enough. So in order to clear the spindle I have to have enough for the 3.5" on the inboard side. Yeah, I noticed that about them fitting on the rear, I measured my rear hubs and they are in fact 4x110... It confused me at first, they should fix that.
Here are a few pics with the SC shocks up front, much better... one quick question, in the left pic if you look at the spindle where it attaches to the tie rod ball end, you can see that it is a little bent towards the tire about 1cm... I was letting my friends brother n law drive through our trails and he clipped a tree. I don't want to have to send the spindle back for something simple like this but I would like to unbend it. How would you go about unbending it without messing something up? Last edited by T3beatz; 11-23-2011 at 08:29 PM.
|
|
#45
11-23-2011, 08:48 PM
|
||||
|
||||
|
APS has the 8" AP2946 rim which is 5-3/8" wide on a 4x4" pattern which would be a better fit.
Your local Harbor Freight has this one: http://www.harborfreight.com/48-inch...ire-44143.html Remove the tie rod joint and see if you bend the spindle steering tab back with a large adjustable crescent wrench. Last edited by GX150; 11-23-2011 at 08:58 PM.
|
|
#47
11-23-2011, 10:59 PM
|
||||
|
||||
|
Thanks guys, I went ahead and bit the bullet, I think these should work so I bought two of them... http://www.ebay.com/itm/8x5-63-4x4-J...ht_2985wt_1056
Now to get the 4x4 hubs from BMI, and then figure out how to get tires off of rims, and put them on others! lol
|
|
#48
11-23-2011, 11:27 PM
|
||||
|
||||
|
Do you shop at Northen Tools? I know you've bought everything!!! for future reference http://www.northerntool.com/shop/too...duct_7813_7813
This is the whole set-up for wide fronts without any off-set issues.
|
|
#49
11-23-2011, 11:56 PM
|
||||
|
||||
|
Yep I check in there from time to time, I looked at that set too, I'm going with the thinner fronts... I do plan on upgrading to 20"s on the front next year sometime and 22x10x8 on the back after the holiday season is over.
Right now I'm just trying to get her somewhat trail worthy.
|
|
#50
12-02-2011, 12:32 AM
|
||||
|
||||
|
Well, my stuff came in and I switched the tires out, this was my first time doing this and it was a pain, the bead would not seat for some reason so I had to get some bead sealer to help me out... that worked but I got the sealer on the rims a little, but it's not that hard to clean off, I have to paint the rims anywho.
The buggy looks so much better now, and now it sits about 9 1/2" in the front under the center of the bulkhead, 10" or so under the pedal area of the floor, about 13" under the drivers seat. I now need to get some 22" tires with some more aggressive tread on the back (currently running stock 20's). The front tires are pretty good to have been free (came with the buggy). hopefully I can hit the trail and test it out tomorrow. The only other thing I don't like is the lower Arms shock mount sticking under the Arms, I only have about 7"s of clearance but with them being so close to the wheels I don't see it being a problem. A few pics...
|
|
#52
01-19-2012, 12:04 AM
|
|||
|
|||
|
Hello;
I haven't posted an update lately but still been "breaking in" the red buggy and getting on daily to check out all the cools things everyone is doing. I did get the blue kart running but it was in need of some attention sooner than later. I got a hold of Tom and he hooked me up with some parts. The new 59mm cylinder/piston is in and it will be getting topped off with a refreshed head(Port&Polish via Tom). I can't thank Tom enough for taking the time to educate me on these engines. He's definitely a top notch guy and I highly recommend doing business with him. Once I get the engine running and the other misc things I have going worked out I'll post up a video. Take it easy... SoapKart (Will)
|
|
#54
01-20-2012, 08:35 AM
|
||||
|
||||
|
Did you see these for the rears?
http://www.*************/item/22-Rear...-46000020-7698 It's a smoking, crazy good deal!!!! I bought them for the rear of my Yerf 3206. They're a direct fit to the rears, won't work on the fronts unless you use the buggy Depot Heavy Duty spindles. (4 X 110) Kenda dominators are 4 ply tires that run around $75 each. These are already mounted, so it's just a simple swap.
|
|
#55
01-20-2012, 12:30 PM
|
|||
|
|||
|
Yep. That's what I purchased for the blue kart. That was a heck of a deal. They hadn't gone on sale yet when I purchased tires for the red kart. I have the BD front hubs so I moved the stock rears to the front. I haven't driven enough to give a quality opinion on that setup but sure will once I get the engine put back together.
|
|
#56
02-08-2012, 08:57 PM
|
|||
|
|||
|
The head showed up last Friday and I was able to get it installed over the weekend. I haven't fired it up yet. I want to get a couple things sorted out first. In the meantime I have some photos of some of the changes I've made to the frame.
I added a piece of angle down the middle of the front mount I added some bracing across the front. Also created a dash for the new tach/speedo; I added a brake light but I decided to install a larger gas tank so the rear rack was increased and the stock bars will be replaced with some that flow with the new rack so the brake light will need to be done over. I even had the wires running internally Pics of the larger rack and new tank. I still need to add some support bars to the new rack. One last picture of the beefed up front spindle. I found that I was making slight adjustments to the red buggies when I bottomed out the shocks a couple times with some ruff landings.
|
|
#57
02-08-2012, 10:16 PM
|
||||
|
||||
|
Looking great--IMO you need gussets on both sides of the upper attachment tubes. I see where you welded two cross members there, that will help but I don't think that'll resolve the twisting effect of the bulkhead loads. There must be a lot of bending of the ball joint tabs!!! We beat these things up pretty bad and have never bent one. The SC gas tank looks awesome
Also nice job on the dash. Can't wait to see the finished buggy.
Last edited by metalstudman1; 02-08-2012 at 10:25 PM.
|
|
#59
02-08-2012, 11:12 PM
|
|||
|
|||
|
Yeah the extra fuel capacity of the SC tank is going to be nice. Metal do me a favor and copy my picture and draw lines where you suggest the extra bracing. I'm getting anxious to see what effect the engine mods have. thanks guys
|
|
#60
02-09-2012, 12:38 PM
|
||||
|
||||
|
Yellow if you just use triangles or red if you just use a plate
|
|
#61
02-09-2012, 05:57 PM
|
||||
|
||||
|
|
|
#62
02-09-2012, 06:24 PM
|
||||
|
||||
|
That's exactly how I braced mine!!
|
|
#63
02-10-2012, 04:31 PM
|
|||
|
|||
|
Thanks. I'll look at adding some additional plate up front.
I have a quesiton regarding the electrical. I'm going to move the electrical to a more water/air tight container to help protect from the elements since I do a lot of riding through water. Should I be concerned with anything getting to hot (rectifier) being more enclosed? In case anyone was wondering, that is the 4.5 gallon tank from Surplus Center.
|
|
#65
02-10-2012, 06:59 PM
|
||||
|
||||
|
The rectifier does get warm and requires a sufficiently large box to dissipate the heat or be mounted outside of the box. I suggest mounting all components with plug side down to prevent water from pooling in the connector.
|
|
#66
02-10-2012, 10:59 PM
|
||||
|
||||
|
My2 cents! The rectifier and CDI are basically waterproof so they don't need any extra protect other than die-electric grease on all connection as Tom suggested and mounted in the air flow as they both stated. The blade or bullet type connectors need additional protection- a simple protection method is shrink tube, you can slide this over the plugs, connect them and center the shrink tube over the joint and heat it up, it'll still be accessible and sealed. Mounting everything in a box is for organization purposes only, I mount electrical components on the horizontal bar behind the seats- I'd hope you never go that deep!!! it's very easy to access.
|
|
#68
02-11-2012, 06:23 AM
|
||||
|
||||
|
Quote:

|
|
#69
02-11-2012, 12:27 PM
|
||||
|
||||
|
These examples are on the Spiderbox & Punisher
|
|
#70
02-27-2012, 07:50 AM
|
|||
|
|||
|
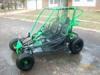
Made some more progress this weekend. I was able to get primer sprayed on the bare metal. I don't think the "blue buggy" is going to be blue anymore. I'm thinking Hemi Orange.
Front with the additional bracing suggested by metal. Back cargo which is wider than stock and removed the rear rollover bars(empty and full)
|
|
#72
02-27-2012, 09:12 AM
|
||||
|
||||
|
Consider adding tabs for 5-point seat belts, adding a winch mounting point point to the nose, adding a battery tray forward of the passenger foot stop, adding a dashboard (horizontal across the top or vertical down the center), and welding the upper and lower cages together before painting.
|
|
#73
02-27-2012, 01:27 PM
|
|||
|
|||
|
Thanks for the suggestions. I have a 4 pt harness setup and added the needed brackets. I have a winch mounting plate back towards the seats. I'm running the cable through the bulk head. We'll see how that is going to work out. I use the ammo box in the cargo area for my battery box/tool chest. I like keeping the front end as light as possible. If I get to the point I want to weld the cage together I will likely build a new roll bar to address some of the line of sight annoyances with the stock setup. Right now I like the ability to unbolt and remove the cage if necessary to gain greater access. Thanks again for the suggestions.
|
|
#74
02-27-2012, 03:34 PM
|
||||
|
||||
|
When you weld it(rollcage) solid you'll feel a NOTICABLE change in the stability.Those front roll bar tubes right dead in your line of sight wore me down too!!!!
|
|
#75
02-28-2012, 07:48 AM
|
|||
|
|||
|
You had to go and throw NOTICABLE out in all caps didn't you. After looking at it last night and throwing the stock bars back on and sitting down in the seat (starting at the stock bar right in your face) I figured what the hell. I had gone this far I just as well go all the way and start making some more adjustments to the roll cage. Thanks for the suggestion GX150 & metalstudman1.
|
|
#77
02-29-2012, 08:21 AM
|
|||
|
|||
|
Picked some more metal up over lunch yesterday and busted out a new cut-off disc last night and started cutting out the tabs. I have the back roll bar ready to be put back on. Hopefully have everything bent and back on by Saturday.
|
|
#78
04-15-2012, 02:23 AM
|
|||
|
|||
|
hey guys & gals. the buggy has taken back row to a couple other projects lately but we've been back at it the last couple weeks off and on. The engine is back together with new electric box and the frame is "done" for now. After some cleanup we should be ready for some fresh paint. Pics to follow shortly.
|
|
#79
04-15-2012, 12:46 PM
|
||||
|
||||
|
So how much cage mod's did you finally do?
|
|
#80
04-16-2012, 12:37 PM
|
|||
|
|||
|
We ended up cutting off all the bolt on tabs and welded the top to the bottom like you guys suggested. I was able to find some tube to insert and replace the gap to make up the difference for what we cut off so we didn't lose any height. We also took the roll bars out a little wider. I need to go through and cleanup the welds and prep for paint but here is how it sits now.
Found a new electrical box in the tupperware aisle. I have it u-bolted to the engine frame with a metal plate underneath supporting it. We'll see how long it survives. I plan to put a zip tie around the whole thing as I wouldn't trust the latches. Last edited by SoapKart; 04-16-2012 at 02:47 PM.
|
|
#81
04-17-2012, 01:09 AM
|
||||
|
||||
|
You're getting there!!!
Looks good so far
|
|
#82
04-17-2012, 01:17 AM
|
||||
|
||||
|
I was thinking of doing what you did to the back rack to mine also. I don't like the curved poles to much I think the strait lines look much better. I just have to get a tubing notcher to start all of these mods.
Looks good.
__________________
T.J. Yerfdog Spiderbox, Uni Type air filter with 6" intake, 130 jet, Orange no-rev limit cdi, Red coil, iridium plug, 1500rpm clutch springs, 1500rpm contra spring, 13g sliders, 22" rears, 21" fronts, aftermarket reverse installed, and Trailtech Vapor.
|
|
#84
04-17-2012, 11:41 AM
|
|||
|
|||
|
Thanks. I may just have it ready by Buggy Bash.
Here's a roll over video for your viewing pleasure I shot with a GoPro in the red buggy. The video was actually shot last December but I just now loaded it to YouTube. I figure you can't just show only the successful rides. I should have known to just park it after I broke one of the front headlights off earlier in the day but that wouldn't be any fun. http://www.youtube.com/watch?v=_a08IMzAIBg
|
|
#86
04-17-2012, 12:33 PM
|
||||
|
||||
|
dude that's crazy, I did the same thing about 3 weeks ago! I was going down a little steep hill like that one and turning right down into a stream then I started to roll slowly. I could have recovered by just turning into the roll but I wasn't thinking at the time. I didn't roll all the way over just flopped on the side.
BTW, how are those SC shocks working for you?
__________________
T.J. Yerfdog Spiderbox, Uni Type air filter with 6" intake, 130 jet, Orange no-rev limit cdi, Red coil, iridium plug, 1500rpm clutch springs, 1500rpm contra spring, 13g sliders, 22" rears, 21" fronts, aftermarket reverse installed, and Trailtech Vapor.
|
|
#88
04-17-2012, 12:47 PM
|
|||
|
|||
|
Quote:
The SC shocks are ok. I don't foresee them lasting for a long time though. I'm going to reconfigure the lower a-arm so the shock is mounted back on top. I clipped a tree stump the other day and that didn't feel to good. I also want to see if I can squeeze a couple more inches of clearance out of it.
|
|
#89
04-17-2012, 02:34 PM
|
||||
|
||||
|
Same here, I just took the front wheel off and road back with my bro and got the tire aired up, good thing I was on our trails and not a huge atv park. Mine was a soft flip so nothing got messed up, just had a little mud and sand on the bars.
Looks like your going through all the same stuff I am. I did the same thing with a stump while riding with my niece, I've road over the stump several times by myself with no problems but with her added weight on the buggy it sunk us down just enough to hit it! Stopped the buggy dead and the seat belts hurt a little, lol. That's when I said it was time to put the shock mounts on the top and get some new shocks (my seals are blown so I'm basically running on springs). I'm going to just extend the top A-Arms, which seems easy to do, I already drilled new holes in the top of the bd spindles to match the bottom. After that I'll just cut whats not needed off. I just have to find some tubing that will slip over the A-arm tubing to extend them.
__________________
T.J. Yerfdog Spiderbox, Uni Type air filter with 6" intake, 130 jet, Orange no-rev limit cdi, Red coil, iridium plug, 1500rpm clutch springs, 1500rpm contra spring, 13g sliders, 22" rears, 21" fronts, aftermarket reverse installed, and Trailtech Vapor.
|
|
#90
04-17-2012, 07:59 PM
|
||||
|
||||
|
"Hey, I'm standing sideways in my buggy ... hmm kinda cool view from here ..." Glad that was a soft one--looked more like it was caused by just the angle and soft bottom of the incline. I've seen a few vids of the at-speed in the corner style rolls with the spiderboxes that led to some injuries (instinctive arm out the side as it goes over)
One thing to keep in mind with these swingarm type buggies--the front suspension has an above ground roll center-- the rear is a dead axle swingarm with a ground level roll center. Once the front suspension maxes-out in a corner, any additional sideways G is going to begin the roll-over since the body can't roll because of the rear's design. When mine was 53 wide up front, it seemed near impossible to roll. It's at 51 wide now and in my vid you can see me save it from a roll -- exact same spot i put it on it's side in stock form and plowed into my brush pile sideways. That 2 inches less definitely seems to make it more susceptible. As far as the shock relo, i always wondered about clearance for you guys with the arm flip. Way too many protruding rocks for me to run something like that without hooking it. If you can, make both an upper and lower shock mount with 2-3 positions each. it lets you alter ride height and compression rate to suit the terrain just by moving the shock around. Last edited by x-bird; 04-17-2012 at 08:08 PM.
|
|
#91
04-18-2012, 07:23 AM
|
||||
|
||||
|
Try flying down the trails in a single seater with 50" frt. width. Scarry at times. I believe arm restraints with 5 pt. belts are a necessity. Almost flipped a couple times this past weekend but was able to save it. Hopefully I can figure out the camera and show some vids. I'm STUPID when it comes to computers and electronic gadgets

|
|
#93
04-21-2012, 10:07 PM
|
||||
|
||||
|
That's a cool color- Glad to see that you found some of those little elves to help out!!! I love how you pulled the front of the roll cage out of your line of sight
that's why I changed mine-got tired of staring into a piece of tubing. You'll definitely notice a more stable chassis now!!!
|
|
#94
04-21-2012, 10:59 PM
|
||||
|
||||
|
I like that color also, that was my next choice over the Kawasaki green I went with.
I guess the sucky thing about having the metal plate welded right above the Rack is that it may be hard to "wrench" in that area.
__________________
T.J. Yerfdog Spiderbox, Uni Type air filter with 6" intake, 130 jet, Orange no-rev limit cdi, Red coil, iridium plug, 1500rpm clutch springs, 1500rpm contra spring, 13g sliders, 22" rears, 21" fronts, aftermarket reverse installed, and Trailtech Vapor.
|
|
#96
05-03-2012, 10:58 PM
|
|||
|
|||
|
Slowly but surely making some progress. Currently the garage looks like a bomb went off and threw spiderbox parts everywhere. I worked on getting the lights mounted and the wiring ran earlier in the week. The swing arm has been stripped and tonight I was able to get the parts cut for the additional bearing hanger I plan to attach to help support the middle of the rear axle. How I wish I had one of those cnc plasma tables. Here's some updated pics...
|
|
#99
05-04-2012, 12:15 PM
|
||||
|
||||
|
So far so good- I see you added a horn,brake light & a second set of lights-you'll be seen and heard!!! extension cords are perfect for well insulated wiring
|
|
#100
05-04-2012, 12:33 PM
|
|||
|
|||
|
I ran the wire internally where possible and I picked up some 1/4 inch convoluted tubing to protect the wires but that's a good idea on the extenion cords. I should have went a little bigger on the tubing. I had an old dirt bike hanging around I stripped the horn off of. I figured you never know when you may need to get someones attention. The brake light was cheap and if it keeps me from getting rear ended once it will be worth it. I'm guessing once we have two running buggies around the races will be inevitable.
|
 |
|
|